

Many developer who already use C# will have almost no learning curve to get up to speed with Blazor, and that was actually one of the main ideas. For more information on the framework you can go to https://blazor.net/.
WEB ASSEMBLY ARCHITECTURE
Let’s see what is under the hood to try to at least conceptually grasp the architecture behind the Blazor and how it is at all possible to write code in C# and run it in the browser. The central piece of technology that allows this is Web Assembly, or WASM. You can read more about it here: https://webassembly.org.
The good this is that WASM is not a plugin (remember Silverlight? Those were some bad memories, at least for me), but rather a binary format for stack-based virtual machine that allows client-side scripting in the browser. All major browsers are supported already, from the first quarter of 2017 until now. The .Net runtime gets converted to WASM because Blazor application runs on Mono framework which is specifically compiling to WASM. So in a general sense, instead of transpiling from TypeScript to JavaScript we can compile to WebAssembly, which is a new format for the very same JavaScript virtual machine that is running in all browsers.
This approach also gives us much better speed, since WASM binary format is more than 20 times faster than parsing of the JavaScript file is, so the boost in speed is tremendous.
Since the development of WASM is supported by Microsoft, Apple, Google and Mozilla, I believe this technology will mature even faster now and it has the potential to completely change the way we would be creating SPA applications in the future.
SAMPLE BLAZOR PROJECT
Let’s build a sample project that demonstrates some of the capabilities of the Blazor framework. It is advisable that you follow along and type in the code yourself, but if you do not have that much time then you can use the code that I have create in a GitHub repository at this location: https://github.com/mirano-galijasevic/Blazor.
You need to have at least Visual Studio v. 15.9, ASP.Net and Web Development features installed, and you also need to install:
- .Net SDK (at least version 2.1.5 (current version at the time of writing this is 2.2.1)
- ASP.Net Core Blazor Language Services (from Visual Studio Marketplace), and
- Install the Blazor templates by running this in the command line:
dotnet new -i Microsoft.AspNetCore.Blazor.Templates
Now creating a new project is very straight forward: you just create a new ASP.Net Core Web Application -> select the Blazor template (make sure you have ASP.Net Core 2.1 selected), give it a name and then press OK to create the project:
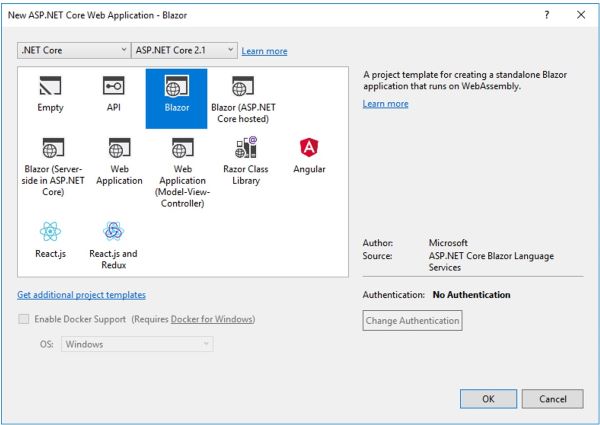
Figure 1.1: Creating a new Blazor project
After the project had been created, compile it and then run CTRL+F5 (with no debugging, since debugging is only partially supported for now).
As you can see, the template is really simple: you have 3 buttons in the sidebar on the left side, and you can move between 3 different views. Data on the Weather Forecast page is hardcoded and comes from the wwwroot/sample-data/weather.json file. As you can see, everything runs on the client side, and there is not a single javascript line.
The structure of the projects is very similar to that of a standard .Net Core project with Razor pages, so let’s go quickly through it before we go on and demonstrate some of the basic capabilities of the framework:
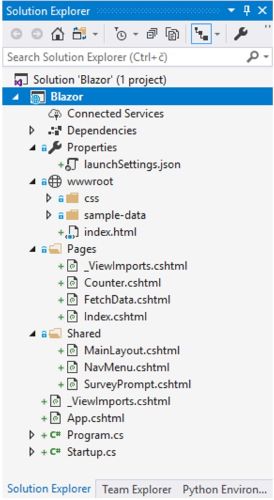
Figure 1.2: Blazor project structure
Wwwroot folder is where the static files are, and it keeps a clear separation between code and static files. It keeps various html, css, image and other static files. This folder is the actual root of the web application when it would be running on the server. We can also see the index.html file here, this is the only file that will be loaded in our SPA application. If you open it, you will see the element in it…this is where the whole application would be running.
Pages folder is where the razor pages are located in. This is the latest approach in .Net Core MVC applications that takes more page-centric approach and makes us more productive. In a classical MVC scenario you would just be constantly switching in the controllers and methods going back and forth, this way it just feels more natural and much more productive. Plus, you get some stuff for free, for instance you do not need to add any XSRF/CSRF generation and validation, as it is done for you automatically. In my experience though, please make sure you just use it to manipulate the DOM and make calls back to the REST services, and then format and display the data on the page. Never add any business logic here.
Shared folder is where the shared razor pages are located in, the ones we use for creating the shared portion of the UI, menus etc.
Program.cs is the main starting point of the application, since the .Net Core web application runs as a console application so it needs to have the starting point as the runtime environment will be looking for it. In previous versions it was the global.asax, if you would remember. The CreateHostBuilder method creates the default builder using the BlazorAssemblyHost, which bootstraps the Startup class, so very similar to the regular .Net Core Web application.
Startup.cs is where we use two important methods: ConfigureServices that is used to configure the services we want to use in the application, and Configure method that is used to start the application processing pipeline. As you may have noticed, the Configure method adds an App component, with the app DOM selector as a parameter, so that the app.cshtml page can be rendered in the tag of the index.html, as we have seen above.
So how does that really start? Just look at the app.cshtml, it just defines the router there, and the router itself comes from the import defined in the _ViewImports.cshtml. So that is what finally gets rendered in the element of the index.html.
Now we have two distinct areas of the application: we have a navigation bar that is on the left, and then we have a context div that is to the right, so when we select a link on the left side the content gets rendered in this area. Please open the file Shared/MainLayout.cshtml, and you will see that the sidebar class has the element defined, and that main class has two divs: one with the top bar and the one where the content gets rendered, designated by the @Body element. Now go to the NavMenu.cshtml just below that file, you will see that here is where a simple navigation bar is created. Please note how the routing works: we just have a simple href on the NavLink element that points to the page we want to open after clicking on that link. For instance, in case of the Counter NavLink, we have the href set to counter, and if you look in the Counter.cshtml file you would see something like this:
@page "/counter"
As you can see, all this and including a simple router is very easy to understand, and in my opinion very elegantly architected. For the most part you can utilize your already existing knowledge of .Net Core MVC or Razor Pages and get started with Blazor in not time, unlike when facing Angular or React or similar JS frameworks where you would have a very steep curve to get started with even simplest of applications. Now let’s do more with this sample application, for instance let’s get the data from the service and display it in a page. After all, this is something we would be doing most of the time so it makes sense to test it first.
Please go to the NavMenu.cshtml and add a new NavLink that would open a test page when clicked. Delete the links that open Counter and FetchData pages and add the one that opens a TestApi page. Your code should look like this:
<div class=@(collapseNavMenu ? "collapse" : null) onclick=@ToggleNavMenu>
    <ul class="nav flex-column">
        <li class="nav-item px-3">
            <NavLink class="nav-link" href="" Match=NavLinkMatch.All>
                <span class="oi oi-home" aria-hidden="true"></span> Home
            </NavLink>
        </li>
        <li class="nav-item px-3">
            <NavLink class="nav-link" href="testapi">
                <span class="oi oi-plus" aria-hidden="true"></span> Test API
            </NavLink>
        </li>
    </ul>
</div>
Now delete the Counter.cshtml and FetchData.cshtml pages, that were created by this project’s template. Add a new Razor view named TestApi.cshtml, and add this code:
@page "/testapi"
@inject HttpClient Http

<h1>Testing API</h1>
<p>This component demonstrates fetching data from the server.</p>

@if ( _apiVersion == null )
{
    <p><em>Loading...</em></p>
}
else
{
    <p>@_apiVersion</p>
}

@functions
{
    string _apiVersion = null;

    protected override async Task OnInitAsync()
    {
        _apiVersion = await Http.GetStringAsync( "http://localhost:5000" );
    }
}
Let us examine this code briefly. As you can see, the page directive at the beginning of the page has the “/testapi” route, which matches the route we have defined earlier with the NavLink element. Next below, we inject the HttpClient so that we can create a Http request and send it to the server, and below that comes a simple DOM manipulation where we want to display the version of the API, if not returned null.
Further below, we have a standard Razor’s function section, where the code is created, much like any other C# code in any application. We just override the OnInitAsync method of the Page, and call our REST service to get the service version.
Please build the code and run it using CTRL+F5….then click on “Test API” link….sure enough, we should get the “Loading….” instead of the version number, since we have not really created the service yet, but everything else works, right?
Let’s now create the service.
SAMPLE REST API
We need a REST service to call in order to fetch the data from it, so let’s go to our solution and then Add -> New Project -> Web -> ASP.Net Core Web Application…let’s name it Blazor.API and click OK. Now let us select an Empty template, deselect the “Configure for HTTPS” option, make sure the ASP.Net Core 2.1 is selected up there, and then click OK again.
I prefer not to use Web API since it adds just too much of the stuff I never need, and there is a lot going on hidden from me in many of those libraries, so I prefer to create the API using the Nancy framework. You can ready more about it here: http://nancyfx.org. So now we have an empty project for the most part, let’s go to the Package Manager Console and type this (make sure the Blazor:API project is selected in the drop-down list for “Default Project”):
Install-Package Nancy -pre
This will install the Nancy package 2.0.0 code name ClintEastwood. This is important as only this version works properly with .Net Core. Also install the Json package the same way:
Install-Package Newtonsoft.Json
Now we have pretty much an empty project, let us add out first AOPI method that will just return the version of this API, and that is publicly available. First go to Startup and then Configure method and delete the last 4 lines that actually return Hello World to the caller (remember, we are not using anything in this API yet, it is plain vanilla, no views or responses), so these lines just write “Hello World” to the response.
Instead of that, we want to plug in the Nancy to the OWIN pipeline, so we do the following:
public void Configure( IApplicationBuilder app, IHostingEnvironment env )
{
    if ( env.IsDevelopment() )
    {
        app.UseDeveloperExceptionPage();
    }

    app.UseOwin( x => x.UseNancy() );
}
You also need to add a using statement:
Using Nancy.Owin;
at the top in using statements.
Okay, that is all we need to do to use Nancy framework, now let’s go and create a new class named VersionModule.cs, and add these lines:
using System;
using Nancy;

namespace Blazor.API
{
    public class VersionModule : NancyModule
    {
        public VersionModule()
        {
            Get("/", _ => "Blazor.API v. 1.0");
        }
    }
}
Let us look what happens here for a bit. We have created a new class and marked it so that it inherits from the NancyModule class. This signifies to the Nancy framework that this class will be handling some routes, so the Nancy will scan the code and look for all the classes that inherit from the NancyModule. We also need to add using statement to use the Nancy framework, and then in the constructor we just denote that we want any calls that are routed to the root of this application and are using GET verb to land here, where we only return a string to the caller. It is really very simple and very elegant way of handling requests, and of creating REST APIs in general.
Let’s test it now, but before that we may improve this a little bit if we specify a hosting address and run it without the use of Visual Studio itself. So please do this, go to the properties of the Blazor.API project, select Debug from the left tabs, then click New besides the profile and add a new profile named, say, NancyAPI. Then select Project as launch type from the drop-down list, and finally add http://localhost:5000 in the App URL box down below. Your property page should look like this:
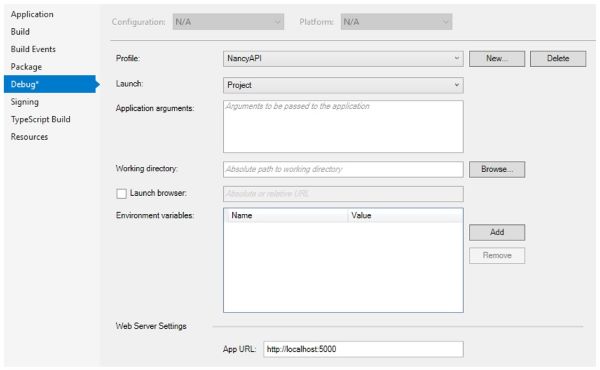
Figure 1.3: Start as project
This allows us to start this as a project profile, so let us now first build the project by right-clicking on the Blazor.API project, then click Build….and now go again to the project, right-click and select “Open Folder in File Explorer” and copy the path where the project is located in. Close this File Explorer, now go to Start and find the “x86 Native Tools Command Prompt for Visual Studio 2017”, run it and type the following:
cd C:\{YOUR PATH}\Blazor.API
and then:
dotnet run –launch-profile “NancyAPI”
This should have started the project to be listening on port 5000 for the incoming requests, showing you something like this:

Let’s test it now, fire up Postman (or any other tools for testing APIs as per your liking), and issue a simple GET request to this endpoint…mine looks like this:
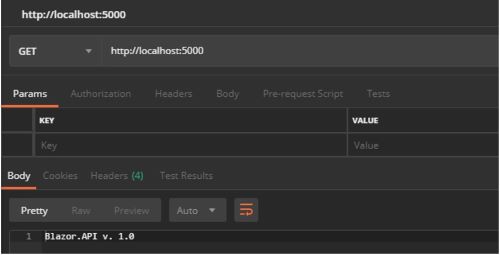
Figure 1.4: Sending a request from Postman
Sure enough, it would return the version string as we have specified it, so everything works fine, our REST API is working. Look at the command prompt, it will should you the requests and their results, this is good for monitoring what really happens and if any of the requests failed and why.
Let’s now add a method that we can use from the Blazor application. Since in the template they show a hard-coded list of forecast data, why now get a dynamic list of it and fetch it from the server, then display it. So we are going to create a new method to fetch the weather forecast, and also a service to use for the purpose. I have chosen the Open Weather Map, it allows you to create a free account which can make 60 calls per minute. If this would now work sometimes later, or somebody uses it and tries to abuse it in some way (hope not!), then just please go to the following address and register yourself to get the API key:
https://openweathermap.org/appid
For now, we are going to be using my API key, so try to issue this request in postman:
api.openweathermap.org/data/2.5/forecast?q=London&APPID=f71fe06a5368e3ba415e7ebe61ba16cd
If everything is okay then it should return the weather forecast for London, in the form of the following result:
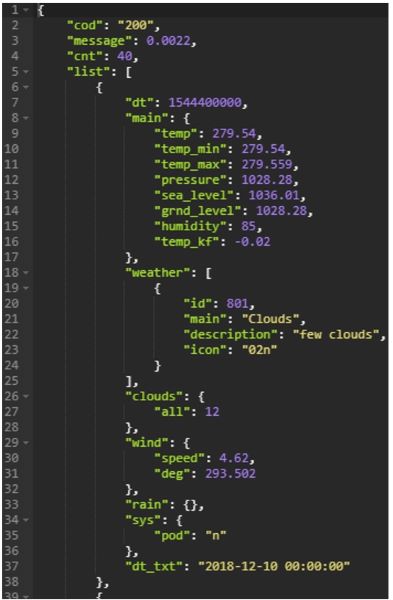
As you can see, we’ve got a json response with all the relevant data in it, which is just what we need. This is only a part of it, since this forecast returns like around 40 items in this list, so it gets pretty big and there will be some parsing of the json file later on. It actually returns 8 results for each day, for every 3 hours, times 5 days it equals to 40 or so, depending on the time you are calling it. If you want to look more into this, then please check this API page descriptions: https://openweathermap.org/forecast5
Now let us go on creating a new class and method to fetch the data….let’s create a new class named “WeatherModule.cs” and in the constructor it will only handle one route, so your code should look like this:
using System;
using System.Collections.Generic;
using System.Linq;
using System.Threading.Tasks;

using Nancy;

namespace Blazor.API
{
    public class WeatherModule : NancyModule
    {
        /// <summary>
        /// C'tor
        /// </summary>
        public WeatherModule() : base( "/weather" )
        {
            Get( "/{city}", async ( args, token) =>
            {
                return null;
            } );
        }
    }
}
As you can see, we have created a new class that implements the NancyModule class and it is defined so that all routes that belong to the /weather router would land here. We then defined the Get router which returns just null. Please also note that we are using a async version of this module – not really needed for this demo, as you are not going to benefit from invoking method asynchronously unless in a service that has some decent load, but nevertheless I believe it is a good practice since it reminds us that all methods in the REST API should by asynchronous, especially if calling back to another service or database, for instance.
However, let’s do even more and make this method call another class that will only be in charge of calling the Open Weather Map service, and let’s do it in a proper way by creating an interface that will be injected using the dependency injection so that we do not have to worry about which concrete class to call in runtime.
To do that, we need to make some changes, so please bear with me. Let us first go to the Startup class and change the Configure method to read like this:
public void Configure( IApplicationBuilder app, IHostingEnvironment env )
{
    if ( env.IsDevelopment() )
    {
        app.UseDeveloperExceptionPage();
    }

    app.UseOwin( x =>
    {
        x.UseNancy( options => options.Bootstrapper = new MyNancyBootstrapper() );
    } );
}
As we can see, we have now changed the last line to not only add Nancy to the OWIN pipeline, but also specified in the options that we want to use our own bootstrapper, not a default one from the Nancy framework.
The intellisense will now complain that there is no MyNancyBootstrapper class, and for the reason. We need to create a new class named MyNancyBootstrapper.cs, so please do that and then copy/paste this code to it:
using System;

using Nancy;
using Nancy.Bootstrapper;
using Nancy.TinyIoc;

using Blazor.API.Weather;

namespace Blazor.API
{
    public class MyNancyBootstrapper : DefaultNancyBootstrapper
    {
        /// <summary>
        /// Override application startup
        /// </summary>
        /// <param name="container"></param>
        /// <param name="pipelines"></param>
        protected override void ApplicationStartup( TinyIoCContainer container,
            IPipelines pipelines )
        {
            container.Register<IWeatherForecast, Forecast>().AsSingleton();

            pipelines.BeforeRequest += ( ctx ) =>
            {
                if ( !ctx.Request.Path.EndsWith( "weather" )
                    && ctx.Request.Path != "/"
                    && ctx.Request.Method != "OPTIONS" )
                {
                    // TODO: Check the authentication header or token here,
                    // and return 401 if not authorized
                }

                return null; // This means that the request will be allowed to
                            // pass on down the pipeline
            };

            base.ApplicationStartup( container, pipelines );
        }
    }
}
using System;
using Nancy; using Nancy.Bootstrapper; using Nancy.TinyIoc;
using Blazor.API.Weather;
namespace Blazor.API { public class MyNancyBootstrapper : DefaultNancyBootstrapper { /// /// Override application startup /// /// /// protected override void ApplicationStartup( TinyIoCContainer container, IPipelines pipelines ) { container.Register<IWeatherForecast, Forecast>().AsSingleton();
        pipelines.BeforeRequest += ( ctx ) =>
        {
            if ( !ctx.Request.Path.EndsWith( "weather" )
                && ctx.Request.Path != "/"
                && ctx.Request.Method != "OPTIONS" )
            {
                // TODO: Check the authentication header or token here,
                // and return 401 if not authorized
            }

            return null; // This means that the request will be allowed
                        //to pass on down the pipeline
        };

        base.ApplicationStartup( container, pipelines );
    }
}
}
This would define a new NancyBootstrapper where we can register classes, check the pipeline and decide whether we are going to allow the request to go through, and much more.
In our case, I am just adding the IWeatherForecast interface and the class that implements it named Forecast to the TinyIoC which is a default Nancy IoC framework. You are not limited to TinyIoC framework only, there are implementations for all major IoC frameworks there, so you just need to go and grab it from the NuGet. I personally use CastleWindsor as my IoC framework of choice, but you can use whatever framework you prefer.
Next after that, I have added a hook to the pipeline that will intercept all requests every time they arrive to the service side, and will check if the request is for the root (in which case we return the version of the API and pass it through), ot if the request is for the route that ends with “/weather”, in which case we allow it again, or if the verb used is OPTION which is what is called pre-flight request where the client tests if the server has certain capability before actually sending a request. In all of these cases we allow the request to go through by returning null, however if we do not want to allow other requests than we can return 401 Not Authorized or something else, depending on the situation. This is the place where you would check the authorization header and check if the client has been authenticated, or if it contains the token that you issued or something else, so that you can authenticate the call. In my opinion this is preferred over using the attributes over the methods, since in this case you would intercept the request and stop it in the pipeline before it even gets routed to the appropriate method, so saving the bandwidth, processing time etc.
We are now lacking the actual implementation of the forecast functionality, so please go to the root of the project and add a new folder named “Weather”, then add Forecast.cs, IWeatherForecast.cs and WeatherForecastModel.cs, so your project would look like this:
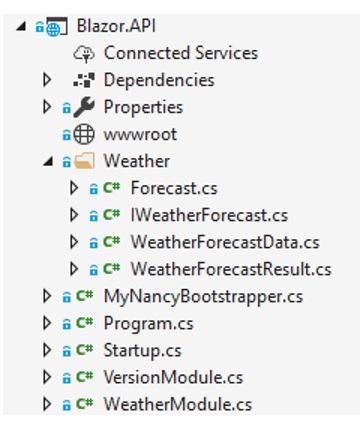
Figure 1.5: Weather forecast classes
Here’s the code for the WeatherForecastData.cs:
using System;
using System.Collections.Generic;
using System.Linq;
using System.Threading.Tasks;

namespace Blazor.API.Weather
{
    public class WeatherForecastData
    {
        public string Temp { get; set; }

        public string Date { get; set; }

        public string Pressure { get; set; }

        public string Humidity { get; set; }

        public string Weather { get; set; }

        public string Clouds { get; set; }

        public string Wind { get; set; }

        public string Rain { get; set; }
    }
}
Here’s the code for IWeatherForeacst interface:
using System;
using System.Collections.Generic;
using System.Linq;
using System.Threading.Tasks;

namespace Blazor.API.Weather
{
    public interface IWeatherForecast
    {
        Task<dynamic> DoForecast( string model );
    }
}
And here’s the code for the Forecast class:
using System;
using System.Collections.Generic;
using System.IO;
using System.Linq;
using System.Threading.Tasks;
using System.Text;

using Nancy;
using Newtonsoft.Json;
using System.Net;

namespace Blazor.API.Weather
{
    public class Forecast : IWeatherForecast
    {
        /// <summary>
        /// API key
        /// </summary>
        /// <remarks>
        /// This should probably go to the configuration file
        /// </remarks>
        private const string _apiKey = "f71fe06a5368e3ba415e7ebe61ba16cd";

        /// <summary>
        /// Root of the web service
        /// </summary>
        /// <remarks>
        /// This should probably go to the configuration file
        /// </remarks>
        private const string _apiAddressRoot =
            "http://api.openweathermap.org/data/2.5/forecast";

        /// <summary>
        /// C'tor
        /// </summary>
        public Forecast()
        {}

        /// <summary>
        /// Get weather forecast
        /// </summary>
        /// <param name="cityName"></param>
        /// <returns></returns>
        public async Task<dynamic> DoForecast( string city )
        {
            StringBuilder address = new StringBuilder( _apiAddressRoot );
            address.Append( $"?q={city}&APPID={_apiKey}&units=metric" );

            HttpWebRequest request = ( HttpWebRequest )WebRequest.Create(
                address.ToString() );
            request.Method = "GET";
            request.ContentType = "application/json";

            string result = null;

            try
            {
                var response = await request.GetResponseAsync();

                WeatherForecastResult foreacastResult =
                    new WeatherForecastResult( ( HttpWebResponse )response );
                result = foreacastResult.ParseResult();
            }
            catch ( Exception ex )
            {
                //TODO: log this...for now we only diplay it in the command windows
                Console.WriteLine( ex.ToString() );
            }

            return new Response
            {
                ContentType = "application/json",
                StatusCode = Nancy.HttpStatusCode.OK,
                Contents = _ =>
                {
                    using ( var writer = new System.IO.StreamWriter( _ ) )
                    {
                        writer.Write( result );
                    }
                }
            };
        }
    }
}
As you can see, nothing much is in here, except for the Forecast class itself. The WeatherForecastData just defines a model that will be used to parse the forecast data and then serialize it to json to be passed on to the Blazor application. The interface just specifies the contract that Forecast class needs to implement, and in the Forecast class itself we simply build a web request, specify the address and write the response back to the response stream. Before that, we call into WeatherForecastData to actually parse that convoluted json result and build a collection of data to be passed back to the caller, so that we do not need to do the parsing on the client side. Add the WeatherForecastData class with the following code:
using System;
using System.Collections.Generic;
using System.IO;
using System.Linq;
using System.Net;
using System.Threading.Tasks;

using Nancy;
using Newtonsoft.Json;
using Newtonsoft.Json.Linq;

namespace Blazor.API.Weather
{
    public class WeatherForecastResult
    {
        /// <summary>
        /// Web response result
        /// </summary>
        private HttpWebResponse _response;

        /// <summary>
        /// C'tor
        /// </summary>
        public WeatherForecastResult( HttpWebResponse response )
        {
            if ( response == null )
                throw new ArgumentNullException( "response" );

            _response = response;
        }

        /// <summary>
        /// Parse result
        /// </summary>
        /// <returns></returns>
        public string ParseResult()
        {
            string data = UnpackResult( ( HttpWebResponse )_response );

            List<WeatherForecastData> weatherForecastData =
                new List<WeatherForecastData>();

            var json = Newtonsoft.Json.Linq.JObject.Parse( data );
            foreach ( JProperty item in ( JToken )json )
            {
                if ( item.Name == "list" )
                {
                    JArray array = JArray.Parse( item.Value.ToString() );

                    foreach ( var iter in array.Children() )
                    {
                        var itemProperties = iter.Children<JProperty>();

                        WeatherForecastData newWeatherForecastData =
                            new WeatherForecastData();
                        newWeatherForecastData.Date =
                            GetElement( itemProperties, "dt_txt" );

                        // Main
                        newWeatherForecastData.Temp =
                            GetElement( itemProperties, "main", "temp" );
                        newWeatherForecastData.Pressure =
                             GetElement( itemProperties, "main", "pressure" );
                        newWeatherForecastData.Humidity =
                            GetElement( itemProperties, "main", "humidity" );

                        // Weather
                        newWeatherForecastData.Weather =
                            GetElement( itemProperties, "weather", "description" );

                        // Clouds
                        newWeatherForecastData.Clouds =
                            GetElement( itemProperties, "clouds", "all" );

                        // Wind
                        newWeatherForecastData.Wind =
                            GetElement( itemProperties, "wind", "speed" );

                        // Rain
                        newWeatherForecastData.Rain =
                            GetElement( itemProperties, "rain", "3h" );

                        weatherForecastData.Add( newWeatherForecastData );
                    }

                    break;
                }
            }

            var serializedData = JsonConvert.SerializeObject( weatherForecastData );
            return serializedData;
        }

        /// <summary>
        /// Get element from property
        /// </summary>
        /// <param name="elementName"></param>
        /// <param name="property"></param>
        /// <returns></returns>
        private string GetElement( JEnumerable<JProperty> root,
            string elementName, string subElement = null )
        {
            string result = null;

            var elem = root.FirstOrDefault( x => x.Name == elementName );
            if ( elem == null )
                return String.Empty;

            result = elem.Value.ToString();

            if ( subElement != null )
            {
                if ( elementName == "weather" )
                {
                    JArray array = JArray.Parse( elem.Value.ToString() );
                    foreach( var item in array.Children())
                    {
                        var props = item.Children<JProperty>();
                        var resElem = props.FirstOrDefault( x => x.Name == subElement );
                        if ( resElem != null )
                            result = resElem.Value.ToString();
                        else
                            result = "0.0";

                        return result;
                    }
                }

                var itemProperties = elem.Value.Children<JProperty>();

                var subElem = itemProperties.FirstOrDefault( x => x.Name == subElement );
                if ( subElem != null )
                    result = subElem.Value.ToString();
                else
                    result = "0.0";

                return result;
            }

            return result;
        }

        /// <summary>
        /// Unpack the response stream
        /// </summary>
        /// <param name="response"></param>
        /// <returns></returns>
        private string UnpackResult( HttpWebResponse response )
        {
            string result = null;

            try
            {
                Stream stream = response.GetResponseStream();

                if ( stream != null )
                {
                    StreamReader sr = new StreamReader( stream );

                    if ( sr != null )
                    {
                        result = sr.ReadToEnd();

                        sr.Close();
                        sr.Dispose();
                    }

                    stream.Close();
                    stream.Dispose();
                }

                response.Dispose();
            }
            catch ( Exception ex )
            {
                //TODO: log this...for now we only diplay it in the command windows
                Console.WriteLine( ex.ToString() );
            }

            return result;
        }
    }
}
This code is pretty straightforward as it only gets the result in json and then converts it to JObject and JArray so that we can iterate through the properties and get the data back. I am sure this can be improved, probably also to add some more defensive code, but it will do for this example.
With all that in place, we need to now go back to the WeatherModule that we have created earlier, and add this code to it:
using System;
using System.Collections.Generic;
using System.Linq;
using Blazor.API.Weather;
using Nancy;
using Nancy.ModelBinding;

namespace Blazor.API
{
    public class WeatherModule : NancyModule
    {
        /// <summary>
        /// Weather forecast implementation
        /// </summary>
        private IWeatherForecast _weatherForecast;

        /// <summary>
        /// C'tor
        /// </summary>
        public WeatherModule( IWeatherForecast weatherForecast ) :
             base( "/weather" )
        {
            if ( weatherForecast == null )
                throw new ArgumentNullException( "weatherForecast" );

            _weatherForecast = weatherForecast;

            Get( "/{city}", async ( args, token ) =>
               {
                   var city = args[ "city" ];

                   if ( null != city )
                   {
                       var result = await _weatherForecast.DoForecast( city );
                       return result;
                   }
                   else
                       return new Response()
                        { StatusCode = HttpStatusCode.BadRequest };
               } );
        }
    }
}
Everything should look familiar by now, it is again a NancyModule that specifies it wants to handle the requests coming to the “/weather” route, more specifically it would handle a POST request sent to this address. We have create the POST method, when it is usually that we would use a GET request to fetch data, but I just wanted to demonstrate the usage of a POST request and the async method of it in the Nancy framework.
There is one final thing to do if we want our API to work, and that is adding the CORS policy, otherwise any calls from the client will be rejected. So please modify the ConfigureServices and Configure methods of the Startup class to read like this:
public void ConfigureServices( IServiceCollection services )
{
    services.AddCors( options =>
    {
                options.AddPolicy( "MyCorsPolicy",
                    policyBuilder =>
                    {
                        policyBuilder
                            .AllowAnyHeader()
                            .AllowAnyMethod()
                            .AllowCredentials()
                            .WithOrigins( "http://localhost:2059" );
                    } );
            } );
    }

    // This method gets called by the runtime. Use this method to configure
    // the HTTP request pipeline.
    public void Configure( IApplicationBuilder app, IHostingEnvironment env )
    {
        if ( env.IsDevelopment() )
        {
            app.UseDeveloperExceptionPage();
        }

        app.UseCors( "MyCorsPolicy" );
        app.UseOwin( x =>
            {
                x.UseNancy( options => options.Bootstrapper =
                    new MyNancyBootstrapper() );
            } );
}
So, we first create the policy and add it to the service, then we specify that we want to use it with IApplicationBuilder. Please note that you need to use the port your Blazor project would be using, instead of the one I am using, which is 2059, as your port would most likely be different. Just go to Properties/launchSettings.json, and you can find it under applicationUrl setting of the IISSettings node. This is very standard stuff and is a good example that we should not really rely on Nancy to do just everything, we can do this more easily using the familiar approach that is used in the .Net Core applications, and that is just what we did with specifying the CORS policy in this way.
This concludes the REST API project, please build it and then start it from the command prompt, as we did before, by running it from the command prompt. Then go to Postman and send a GET request to http://localhost:5000, it should return “Blazor.API v. 1.0”.
Remember earlier how we created a TestApi page and that it only returned “Loading….”, since we did not have the service in place? Well now we have it, and it should work right away, so please make sure the Blazor project is set as start up and then run it without debbuger with CTRL + F5. When it opens, go to the Test API page, and the API version should show.
Now the last thing is we need to add a new page, send a request for some city and fetch the weather forecast for the next 5 days. We have already built the service, now we need to work on the UI side. So let’s add a new link to the NavMenu.cshtml:
<li class="nav-item px-3">
    <NavLink class="nav-link" href="weather">
        <span class="oi oi-cloudy" aria-hidden="true"></span> Weather Forecast
    </NavLink>
</li>
This only adds a new link on the sidebar, that routes to the weather page. We now need to add a new page named WeatherForecast.html to the Pages folder, with the following code:
@page "/weather"
@inject HttpClient Http

<h1>Weather Forecast</h1>
<p>This component demonstrates getting a weather forecast.</p>

<p>
    <label>City name:</label>
    <input type="text" bind="@_city" />
</p>
<p>
    <button class="btn btn-primary" onclick="@GetWeatherForecast">
        Get Forecast
    </button>
</p>

@if ( _weatherForecastData != null )
{
    <table class="table">
        <thead>
            <tr>
                <th>Date</th>
                <th>Temp. (C)</th>
                <th>Pressure (hPa)</th>
                <th>Humidity (%)</th>
                <th>Weather</th>
                <th>Clouds (%)</th>
                <th>Wind (m/s)</th>
                <th>Rain (mm/3h)</th>
            </tr>
        </thead>
        <tbody>
            @foreach ( var forecast in _weatherForecastData )
            {
                <tr>
                    <td>@forecast.Date</td>
                    <td>@forecast.Temp</td>
                    <td>@forecast.Pressure</td>
                    <td>@forecast.Humidity</td>
                    <td>@forecast.Weather</td>
                    <td>@forecast.Clouds</td>
                    <td>@forecast.Wind</td>
                    <td>@forecast.Rain</td>
                </tr>
            }
        </tbody>
    </table>
}

@functions
{
    string _city = null;
    string _data = null;
    List<WeatherForecastData> _weatherForecastData = null;

    async Task GetWeatherForecast( UIMouseEventArgs args )
    {
        var result = await Http.GetAsync( $"http://localhost:5000/weather/{_city}" );

        if ( result.StatusCode == System.Net.HttpStatusCode.OK )
        {
            _data = await result.Content.ReadAsStringAsync();
            _weatherForecastData =
                JsonConvert.DeserializeObject<List<WeatherForecastData>>( _data );
        }
    }
}
This page looks really similar to the one we used to fetch the API version, but in addition it has a textbox and a button so that we can send a request for whichever city user enters in the text box. This should all be working now, but there is one more thing we need to do. We have installed the Newtonsoft.Json package earlier, but it will throw an exception due to the linker. This is an issue with the current Blazor implementation, so it may be resolved in the future releases, however right now we need to do the following – please go the the Blazor.csproj, open it with notepad, and ad this line to the node:
<BlazorLinkOnBuild>false</BlazorLinkOnBuild>
We should now be okay, let’s test it….build the project, then CTRL+F5 and go to the Weather Forecast page and enter any city…I used London, Madrid, New York myself, but please feel free to try any other city. You should get something like this as a result:
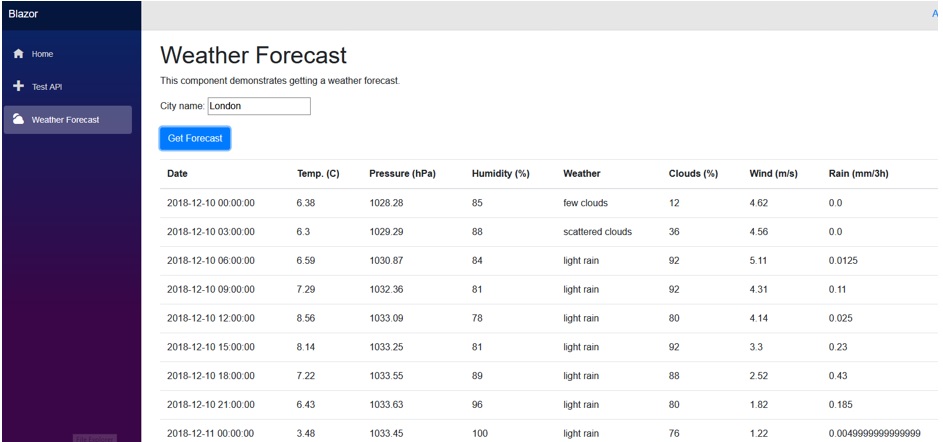
Figure 1.6: Weather forecast result
CONCLUSION
I hope you have enjoyed this short demonstration of the Blazor functionality. Please make sure you check the Blazor documentation at http://Blazor.net since it has a very clear documentation, and you can see more about binding, routing, debugging and many other functionalities. This framework is still in beta but is moving forward rapidly, so many of the things that are working with this version may not be working with the next versions this way and may be changed.
I strongly believe that this approach in creating SPA application is going to become prevalent one and that we would be able to utilize a full stack C# language, with all its capabilities, beauty and elegance to code the SPA applications without having to use any JavaScript.
