

This is the first part of the series of articles about microservices with Docker and Kubernetes. The code for this post can be found here: https://github.com/mirano-galijasevic/microservices
INTRODUCTION
It has never been easier to create microservices than today, with the inception of containerization and various powerful orchestrators, such as Kubernetes. I will skip much of the theory in this post, or trying to convince you why you should take this route, but will mainly focus on how to get up running microservices in Docker and Kubernetes as quickly as possible. If anything seems unfamiliar or not clear enough, please ask a question in the discussion forum.
I will skip much of the theory in this post, or trying to convince you why you should take this route, but will mainly focus on how to get up running microservices in Docker and Kubernetes as quickly as possible. If anything seems unfamiliar or not clear enough, please ask a question in the discussion forum.
WHY MICROSERVICES WITH DOCKER
The short answer is: if you have anything but a simple few-page web application, you need to have some kind of backend to support it. Here's where the microservices come into place. Without installing all specific services and infrastructure on your machine, pushing your code to the registry and then explain to all other teams that works on the same project what they need to install on their dev machines in order to make it work, we just package everything in the containers and publish the container, so that other can connect to it and use it, in different environments.
This provides for a clean separation of work between different teams, that can use very different technologies for their work, and it is still possible to work on the same project seamlessly. After you create a number of services, it can become a hassle to manually coordinate everything. Also, if you want to have some kind of redundancy and run some of the services with mutiple instances, but also to be able to have something like zero-outage deployments of new versions of those microservices: well for this and much more, we come to the role that Kubernetes plays. You can consider it as an orchestrator of all microservices you are creating.
SAMPLE PROJECT
I am a strong believer in creating something real-life alike, because otherwise the talk is just cheap and too much theory becomes....well, too much theory. So this is what we should create in this post:
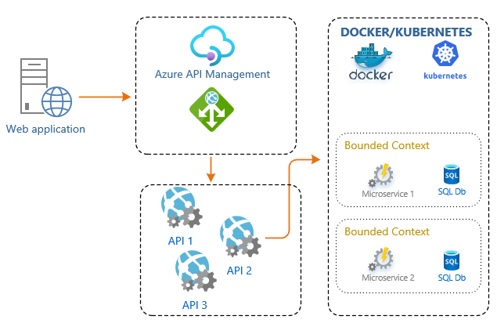
Figure 1.1: Architecture
Since this is the first post in a series of several of them, we shall create this locally only. Then, we shall move everything to Azure Container Registry and Azure Kubernetes Services, and then in the third post we'll see how we can utilize Azure Service Bus to support distributed communication between the microservices, and why is that important.
Looking at Figure 1.0 above, we are going to create what is in the right-most box that reads Docker/Kubernets, we are not going to be creating the web application, or the APIs, because this is very simple and I am sure that you have done it many times before. In order to test our work, we are going to simply send a request using the Postman directly to the microservice. Of course, you should never do that in a real-world application, I strongly recommend creating the Web API (or some other API) the way you usually do it, and then call them from you web application. Even better, I would also recommend implementing the gateway pattern in between, so as not to call the API directly from the web application but instead using the Azure API Management in between, or Ocelot or something similar, and then letting these services to route your request to the target API. There are many benefits to using the gateway pattern and having only one entry into your backend, for instance:
- to simplify the authentication,
- decrease the surface of attack,
- implement caching and throttling in one place only,
- make your web app only know one single endpoint address, not several of them, the gateway knows how to route the request and where, so if you need to change the API service or some methods in it, you can easily do that without affecting the client application at all,
- you can also intercept the request, modify the headers or do some other work, both in the inbound and well as the outbound pipelines,
- and many other benefits.
I am also not going to implement any domain model, the way you should normally do it in the microservices, since that would introduce an additional overhead and complexity, and I promised to keep things simple.
However, there are two notes that I just cannot skip, because they are very important, or the microservices would not make sense at all.
Firstly, you need to align microservices with the bounded context of your business domain. Yes, you can have several microservices in one bounded context, but never one microservice that spans over several bounded contexts, as that would not make sense. If you want to check more about domain drive design (DDD) and domain model, which is an implementation of DDD, and consequently bounded contexts and other goodies of the domain modelling, then you should get yourselves familiar with people such as Eric Evans and his book "Domain-Driven Design" (https://amzn.to/3bbXKhR), Martin Fowler discussing Domain Model, Bounded Contexts, CQRS etc. (https://bit.ly/2YGSbFA), and Dino Esposito's book "Architecting Applications for the Enterprise" (https://amzn.to/35DnhiE).
Secondly, please do not add any logic or business workflows in the APIs. I see this huge mistake over and over again. The APIs are there to receive a request, and then pass them on to some service for processing (such as our microservices we shall be creating), but there should be no business domain knowledge in the APIs at all, hence no processing of any kind either. Yes, you can transform the request, extract data and prepare it for sending to some kind of service, and then you can send back the results, but please do not do any kind of business workflow in the APIs.
For this post, we are focusing on creating the containers and running them under Kubernetes, that is all, so let's do just that.
INSTALLING DOCKER
First we need to install Docker Desktop on our machine, since we will be using the Docker CLI for working with images and containers. Please go ahead to https://www.docker.com/ and create a free account there. Then when you log in, you should go to this location: https://hub.docker.com/, and then to the right of the page you would find a link to download Docker Desktop. The installation is pretty straightforward, but since it is around 1 Gb download it will take some time.
I use this on Windows 10 desktop machine, due to the internals of Docker you should really go for installing it on a desktop machine, not some kind of VMware or any other virtual machines. The virtualization in virtualization is not really supported, and even though I have seen it working on my Mac machine in Parallels, you should really go for installing it on a desktop machine, in order to avoid weird behavior without even knowing it is connected to that.
After you have installed it, please go to command prompt and type this:
docker version
You should get something like this:

This means that Docker was properly installed, and we can use it now to create containers. Before we move on, please notice that there is now an icon in your taskbar, or maybe it is hidden but should be there, it would have an icon of a Docker whale...please right-click on it and go to Settings.
Here you can see various settings of Docker....please go to Resources -> File Sharing....and make sure you C drive is shared. Then go to Kubernetes and click on Enable Kubernetes. This will take a while....after that, you should see two green dots on the bottom of the window, indicating that both Docker and Kubernetes are running.
Also, right click on the icon and make sure you switched to Linux containers, if not already, because we are going to be using Linux containers, not Windows ones.
It is a good idea to install Postman as well at this point, as we will need it later.
CREATING DOCKER IMAGES
Let us now create the Docker container that will have the operating system running, .Net Core SDK and any other services needed in order to run our microservice.
The microservice we are creating will be a simple API service, so that it can receive the http requests from the outside, and there will be almost no logic in it, since we are focusing on the Docker ecosystem, not the services themselves. But then, you can add your logic there once the containers are working together.
One thing to note in the beginning: we first create a Docker image, which is a read-only image that represents usually multiple layers that gives us the operating system and any other services running that are needed for our application to work. This is a read-only file, and is then used to create and run containers, that are based off of them. So this is something to keep in mind.
We are going to create our microservice 1 (as per Figure 1.0 above) as a Web API, using .Net Core 3.1. Please make sure you have Visual Studio 2019 and .Net Core 3.1 installed on your machine.
Please go to Visual Studio and create a new project, Asp .Net Core web Application, and then select the API and Docker support for Linux, like this:
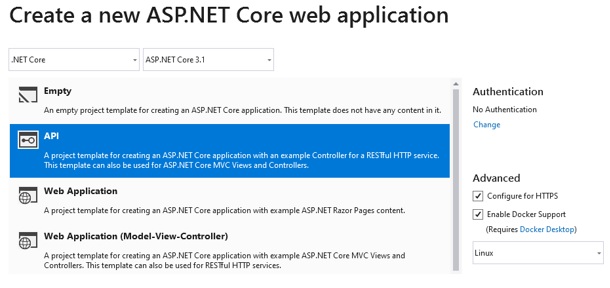
Figure 1.2: API Project
Please also make sure you select the ASP.Net Core 3.1 from the drop-down above, if you have more than one SDK installed.
I gave my project the name of TestMicro, but of course you can name it as you please.
Go to appsettings.json, and add the version key at the end, like this:
{
  "AllowedHosts": "*",
  "Version": "1.0"
}
Now go to Controllers folder and rename the WeatherForecastController to read TestController, and change the code to this:
using System;
using Microsoft.AspNetCore.Mvc;
using Microsoft.Extensions.Configuration;
using Microsoft.Extensions.Logging;

namespace TestMicro.Controllers
{
    [ApiController]
    [Route( "[controller]" )]
    public class TestController : ControllerBase
    {
        /// <summary>
        /// Class logger
        /// </summary>
        private readonly ILogger<TestController> _logger;

        /// <summary>
        /// Configuration
        /// </summary>
        private readonly IConfiguration _configuration;

        /// <summary>
        /// C'tor
        /// </summary>
        /// <param name="logger"></param>
        /// <param name="configuration"></param>
        public TestController( ILogger<TestController> logger, IConfiguration configuration )
        {
            _logger = logger;

            if ( null == configuration )
                throw new ArgumentNullException( nameof( configuration ) );

            _configuration = configuration;
        }

        [HttpGet]
        public ActionResult<string> Get()
        {
            string version = _configuration [ "Version" ] ?? "0.0";

            return new JsonResult( $"TestController, v. {version}" );
        }
    }
}
So it is a simple controller, with just one method that fetches the version key from the settings file, and returns it.
Please build the project, then go to command line, change director to where your .csproj file of your project is, and then run it with dotnet run.
You should see something like this:
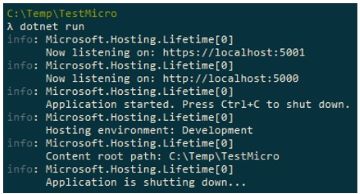
This actually finds the project configuration and runs it, so it is running on port 5000 as we can see (check different profiles by going to project, properties and then debug tab).
Let us now open the Postman and send a GET request to the following address:
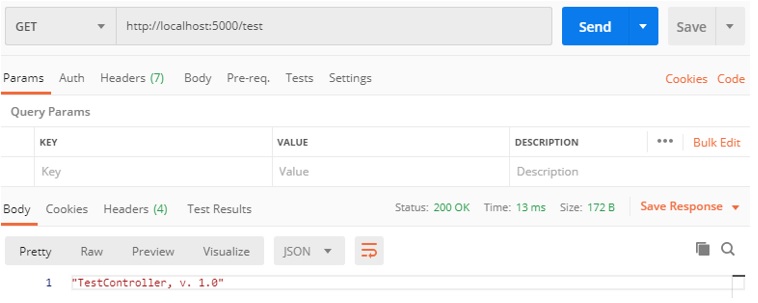
As we can see, the response correctly returns the version that we have set in the appsettings.json.
This means we now have a simple API service running properly. Let us now examine the Docker file that was created when we created the project. This file contains commands to create the image, but unfortunately the one created by Visual Studio template will not work, so we need to modify it a little bit. Please change the Docker file to read like this:
FROM mcr.microsoft.com/dotnet/core/aspnet:3.1-buster-slim AS base
WORKDIR /app
EXPOSE 80
EXPOSE 443

FROM mcr.microsoft.com/dotnet/core/sdk:3.1-buster AS build
WORKDIR /src
COPY *.csproj ./
RUN dotnet restore
COPY . .
WORKDIR "/src"
RUN dotnet build -c Release -o /app/build

FROM build AS publish
RUN dotnet publish -c Release -o /app/publish

FROM base AS final
WORKDIR /app
COPY --from=publish /app/publish .
ENTRYPOINT ["dotnet", "TestMicro.dll"]
The main difference is really that the paths create originally would not work for the Linux images, but we shall come back to the file and go through it more thoroughly to understand what all this means later in this section.
So let's review where we are at right now. We have a project running properly, which is just a simple API project, we have a working Dockerfile, and we now want to use this file to create the Docker image. Remember, docker image is the read-only image that contains everything that we need to create and run the container.
So let us now go to the command prompt again, and type docker images command:

Your output can differ, but the point is that you would see the images currently on your machine. There are various images, some downloaded, and some that local Kubernetes services is using...and we now want to create our own image.
So in the command prompt change the directory to the location where you Dockerfile is, it should be at the root where your project .csproj file is, and then execute the command:

This commands instructs Docker CLI to build the docker image with name microservice1 by using the docker file Dockerfile. Please not the . at the end, it is not a typo, we need it there.
After you execute this command, the CLI is going to start executing all commands from the Docker file, and downloading the appropriate images from the Docker hub. After all 17 steps completed, we can then type the following command to list the images again:

We can see that the image was created, named microservice1, which is 208Mb in size. Please also note the tag is latest, and there is also an image id assigned, we'll need this later.
So we have used the Dockerfile command to create this image, let us now go back to the Dockerfile to analyze it a bit more in depth.
FROM mcr.microsoft.com/dotnet/core/aspnet:3.1-buster-slim AS base
WORKDIR /app
EXPOSE 80
EXPOSE 443
In lines 1-4 we see the instruction to go and download the image containing the operating system and SDK for .Net Core from the hub. Mcr in mcr.microsoft.com stands for Microsoft Container Registry. If we now go to this web address: https://hub.docker.com/_/microsoft-dotnet-core-sdk/?tab=description.
This contains a full description of what this image contains, along with detailed description on how to pull it off, what tags it has (thing of tag as a version info), how it can be used, related images etc. If you scroll a bit down, you can see the full list of tags containing various Linux and Windows images with .Net Core SDK pre-installed:
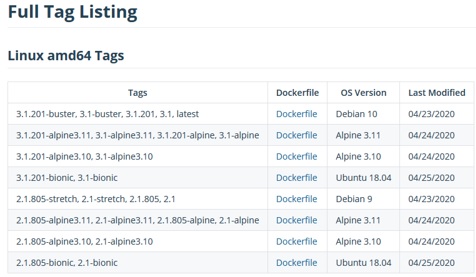
Check the first line, 3.1-buster image, this is a Linux Debian, and this is exactly what is in the first line of the Docker file. So this instruct Docker CLI to go and download this image, as it will be used as a base file for creating the image for our service. Note the AS base instruction, this is like assigning the variable to this command.
The second section of instruction is the one pertaining to the build part of the Dockerfile:
FROM mcr.microsoft.com/dotnet/core/aspnet:3.1-buster-slim AS base
WORKDIR /src
COPY *.csproj ./
RUN dotnet restore
COPY . .
WORKDIR "/src"
RUN dotnet build -c Release -o /app/build
In lines 6-12 we are building the project. So thing really is that we do not want just to create the image with operating system and the SDK, and then to just add our files to it. For that, we would not even need the image that has the .Net Core SDK, but we really do want to push our project files, and then to build them in the image, not locally. Hence, we use the sdk as build, as indicated in line 6, then sets the folder to src as working directory, and then copy the project file and do the restore, in order to restore any referenced libraries. Then we copy all those files to the src folder on the target. Dotnet build is then run to finally build the project, in the app/build folder.
FROM build AS publish
RUN dotnet publish -c Release -o /app/publish
This is the third stage, where the build is used to be published to the app/publish folder. The next is the final section where we copy the published artifacts to the app folder, where our app is going to reside.
FROM base AS final
WORKDIR /app
COPY --from=publish /app/publish .
ENTRYPOINT ["dotnet", "TestMicro.dll"]
These are the command that are executed when we build the image, currently 17 steps in total.
CREATING AND RUNNING THE CONTAINER
Now we have the image...we can now create the container running locally off of this image....we do that by executing the following command:
docker run -d -p 8080:80 microservice1:latest
This runs the container based off of the microservice1 image, tag latest, opening the internal port 80 to external port 8000, using the -p switch.
After this, we'll get the id of the container running. We can check the containers that are running locally by typing this command:
docker ps -a
CONTAINER ID        IMAGE                   COMMAND
4727abd158db        microservice1"latest    "dotnet TestMicro.dll"
We only have one container running, and it is our container that we have just created.
Let us now go to Postman again, and try to access the service running now in the container on port 8000. So let us now test this in Postman:
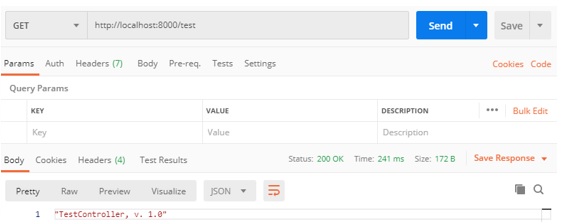
As we can see it works, our services has been deployed to the container and is accessible from the outside.
Let us now go a bit further, and visualize the running container by installing the Containers add-in in Visual Studio. Please go to Manager Extensions menu in Visual Studio, and install this extension:

After that, you can go to View -> Other Windows -> Containers, and then snap the window to some location in the Visual Studio. You should see something like this:

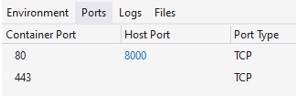
This is the same view as you would get by typing docker ps -a in the command prompt, only better looking and visually more appealing. Check the Ports tab, you should see the port 8000 opened:
Now open the Files tab:
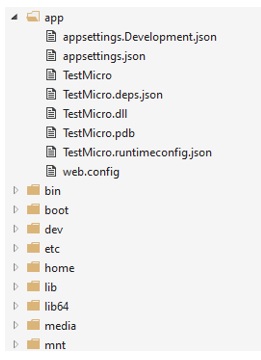
You can see a Linux file system in the running container, our service is located in folder app, just as we have specified it.
It is also possible to set the volumes that will point to the location of the source file, so that we do not have to re-create the image every time we change the code, but this is topic for some other post.
KUBERNETES
We now have the container running, but in the situation when we have many containers and we also want to run some of those with multiple instances, this is where the orchestrators like Kubernetes comes into place.
The local Kubernetes is not a full cluster, and runs on only one node. There are also other limitations, since it is just running on our desktop, but still it is quite enough to test it locally before we push it to the full cluster. We will discuss the architecture of Kubernetes in the next posts, but it is important at this moment to at least visually understand the relationships between the nodes, pods and other structures:
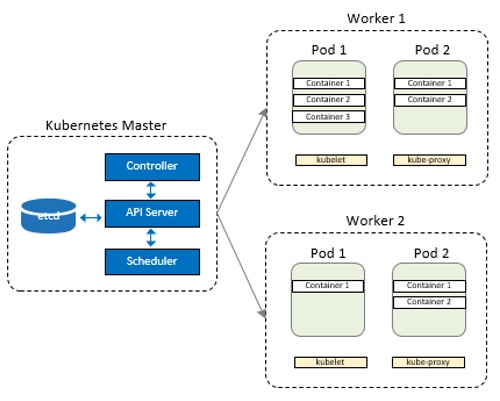
Figure 1.3: Kubernetes Architecture
The Kubernetes has the master node, that runs its server, scheduler and etcd storage. It can also run multiple master nodes, and it is interesting that in the case of Azure Kubernetes Services the master node is maintained by Microsoft, not much that we can do with it, but this is actually good since they guarantee that the master node will not fail, and this is a big deal. On the other hand, if you really need to hack into the master node, than you would probably be running and configuring your own cluster on multiple Linux servers yourself.
As you can see, apart from one master node, there is one or several minions, or worker nodes. Each of those run Kubelet, which is the primary node agent that runs on each node, and is the main service used for communication with the master node. Then we have one or multiple Pods, which in turn run one or several containers. This is enough for the internal architecture of Kubernetes, knowing only this helps you to get oriented on where the containers are actually running, so that you do not fell lost.
Now let us run our container not by executing the command directly, but deploying it to the Kubernetes locally.
We first need to stop the running container.
CONCLUSION
That is all for this post. We have seen how easy it is to create the images, then run containers based on those images, and then to even create several instances of our containers and orchestrate them using Kubernetes.
In the next post we shall see how to create images when we have multiple projects, not just one, and then how to run them in the Azure Kubernetes Services by using the Azure Container Registry.
