

INTRODUCTION
This is the second part of the series of articles about microservices with Docker and Kubernetes. The code for this post can be found here: https://github.com/mirano-galijasevic/microservices2
We have worked primarily on the local Docker and Kubernetes installation, we now need to move things to the cloud. The good thing is that the commands we have used to create images and then create and spin off the containers, as well as the deployments and other commands used on local Kubernetes instance, that would all work in the cloud as well, without need to modify anything. The only difference is the new set of requirements that the Azure would introduce itself.
For instance, we have used the local image to deploy to the Kubernetes, and that worked fine since we have everything accessible locally. Now we need to introduce some intermediate repository where we would push our local image after we create it, and then the Azure Kubernetes Services would fetch the image from there and spin off the containers, just the way we set it up.
So let us now modify our picture of the architecture that we have presented in part 1, which should now look something like this:

Figure 1.1: Azure Container Registry and Azure Kubernetes Services
I have removed the web application, API Management and web API services that we had in the previous post, and now the local Kubernetes is modified to show the Azure Kubernetes Services, i.e. the Kubernetes hosted in Azure. In the same line, I have also added the Azure Container Registry, as we cannot really get the AKS to fetch the image off of our local machine, nor would that be a practical approach. Instead, we are going to push the image to the ACR, create a trust connection between the ACR and AKS, and then create our deployment to AKS in the similar fashion as we have done it in the previous post to the local Kubernetes instance.
CREATING TEST PROJECT
Before we create the image, we first need to create the local project. The project will be more or less the same as in the previous post, but this time we are going to use the main project, and then another project referenced from the main project. This is a very common situation, but it actually creates some challenges when building the image, and we need to sort that out and leave that behind us, since it will sure be more situations where we have several projects that are included in building one microservice, rather than just one.
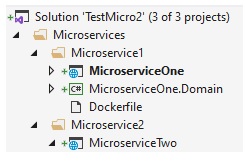
Please create the empty solution file, I will name mine TestMicro2. Then create a solution folder named Microservices, and then two solution folders named Microservice1 and Microservice2 respectively.
We then create two .Net Core Web Applications, select the API project type, .Net Core 3.1, and Docker support for Linux containers, like this:
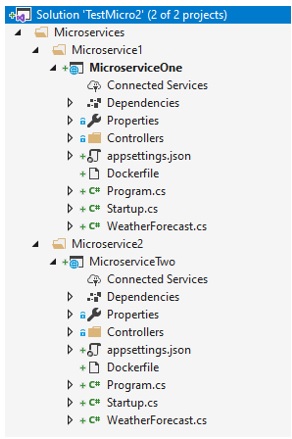
As we can see, we have Microservices -> Microservice1 -> MicroserviceOne project….same for the MicroserviceTwo project. The proper hierarchy of folders is important, as we shall see later on, so please follow the image or check the code repository.
Now we need to go to MicroserviceOne project and delete the WeatherForecast.cs, rename the WeatherForecastController.cs to TestController.cs, and add this code over the existing one:
using System;
using Microsoft.AspNetCore.Mvc;
using Microsoft.Extensions.Configuration;
using Microsoft.Extensions.Logging;
namespace MicroserviceOne.Controllers
{
    [ApiController]
    [Route( "[controller]" )]
    public class TestController : ControllerBase
    {
        /// <summary>
        /// Class logger
        /// </summary>
        private readonly ILogger<TestController> _logger;
        /// <summary>
        /// Configuration
        /// </summary>
        private readonly IConfiguration _configuration;
        /// <summary>
        /// C'tor
        /// </summary>
        /// <param name="logger"></param>
        /// <param name="configuration"></param>
        public TestController( ILogger<TestController> logger, IConfiguration configuration )
        {
            _logger = logger;
            if ( null == configuration )
            throw new ArgumentNullException( nameof( configuration ) );
            _configuration = configuration;
        }

        [HttpGet]
        public ActionResult<string> Get()
        {
            string version = _configuration [ "Version" ] ?? "0.0";
            return new JsonResult( $"MicroserviceOne.TestController, v. {version},
                machine: {Environment.MachineName}" );
        }
    }
}
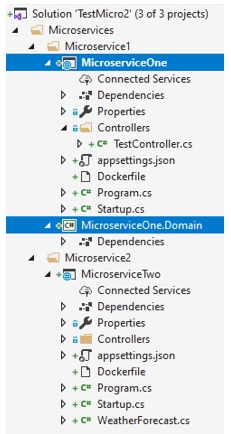
Let us now add another project to the same Microservice1 solution folder (please make sure that the physical path of the project would be under Microservice1 folder, same as the MicroserviceOne project), then name it MicroserviceOne.Domain, the type of the project would be .Net Core Standard, and create it. Delete the Class1.cs that was created. Then go to MicroserviceOne project, Dependencies, and add reference to this project.
So now you would have someting like this:
This simulates the more realistic scenario where we would have several projects in one microservice. In a real project, you would likely create a domain project or several of them to implement the domain model, then one for the DomainService, the another one probably named Infrastructure to implement the repository, and so on, you get the idea. As we have said in the first, this is all about containers, so we are not going to complicate the things with the domain model and other aspects that are not crucial to the main goal, but it is nice to remind that this is where it all goes if you are to implement the full domain model, which you should.
Now go to MicroserviceOne project and rebuild, then go to command prompt, change directory to the location of your project where the project file MicroserviceOne.csproj is located, and run it by using dotnet run:
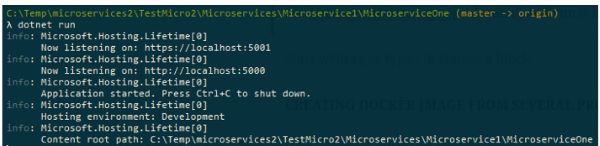
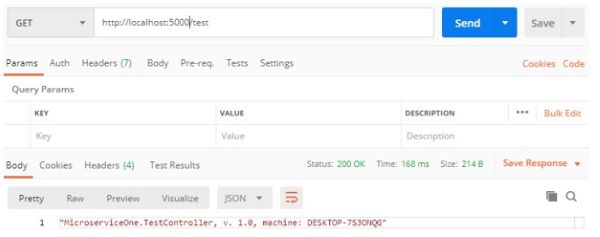
The project is now running on port 5000, so if we hit the endpoint at localhost and port 5000 to the test controller in Postman, we should get a proper response:
Press CTRL+C to stop running the project.
Now do the same for MicroserviceTwo, delete the WeatherForecast.cs file, then change the controller to TestController, same code as in the first microservice, just no need to add and reference the second project. Test the project same way we have tested the first microservice.
CREATING DOCKER IMAGE FROM SEVERAL PROJECTS
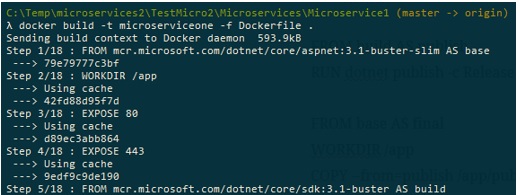
Now when we tested that everything works outside the containers, let us now go and build the image. The first thing to do is to go to the file system and move the Dockerfile from project MicroserviceOne one folder up, then go to the folder in the Solution Explorer and add an existing file….to add it to the structure. This means, the Dockerfile should now be located in folder Microservice 1 like this:
We now need to modify the Dockerfile to read like this:
FROM mcr.microsoft.com/dotnet/core/aspnet:3.1-buster-slim AS base
WORKDIR /app
EXPOSE 80
EXPOSE 443
FROM mcr.microsoft.com/dotnet/core/sdk:3.1-buster AS build
WORKDIR /src
COPY MicroserviceOne/MicroserviceOne.csproj MicroserviceOne/
COPY MicroserviceOne.Domain/MicroserviceOne.Domain.csproj MicroserviceOne.Domain/
RUN dotnet restore MicroserviceOne/MicroserviceOne.csproj
COPY . .
WORKDIR "/src/MicroserviceOne"
RUN dotnet build -c Release -o /app/build
FROM build AS publish
RUN dotnet publish -c Release -o /app/publish
FROM base AS final
WORKDIR /app
COPY --from=publish /app/publish .
ENTRYPOINT ["dotnet", "MicroserviceOne.dll"]
As you can see, the main trick is in specifying the project paths properly from here, so that when they are copied to the target location and when the restore phase starts the referenced project will be available on the target.
Let us create the image now by executing the command docker build -t microserviceone -f Dockerfile .:
This will create our image….now docker run -d -p 7123:80 microserviceone:latest:

Let us not try to issue a GET request to this endpoint using the Postman:
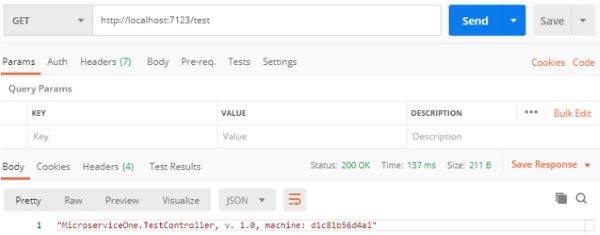
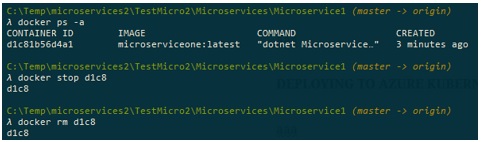
And sure enough, it works properly. This is good…let us stop and remove the local container, as we are not going to need it:
Now we have a local image properly built, and we have asserted that the container can be created based on that image and run locally.
PROVISIONING AZURE CONTAINER REGISTRY (ACR)
We now want to push the local image to the Azure container registry. First we need to provision the ACR now, so let us go to the Azure portal, add New Resource, then Azure Container Registry, and create a new Azure Container Registry:
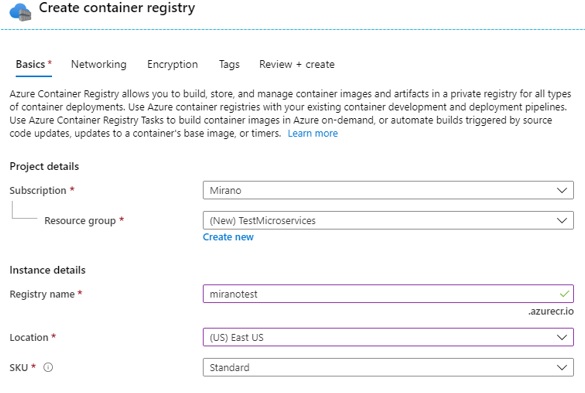
Please note the name of the ACR, which is miranotest.azurecr.io. It should not take more than 2 minutes to complete creating this resource. When created, please go to the resource. Check Repositories -> Services, there is none currently.
PUSHING THE IMAGE TO AZURE CONTAINER REGISTRY (ACR)
Please go to AccessKeys in the ACR resource in Azure Portal, then click to enable the admin user, and note the username and the password down below.
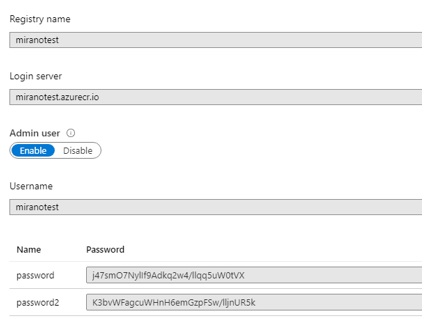
Let us now go back to the command prompt, we now need to log in to the ACR from here….if you do not have Azure CLI installed, please install it as it is needed for this step. Please type this command:

The command az acr login is to login our session to access the Azure Contaioner registry, we then specify the name of the registry, the username and the password, all available on the previous screen. Upon successful login, you should get a “Login Succeeded” notification.
We now want to push the local image to this registry, but first we need to re-tag it, otheDrwise it is not going to work. The image needs to start with the name of the registry we are pushing it to, so like this:

If we go docker images now, we would see that there are two images now:

Please note how Docker is smart enough to create two images, but actually they have the same ID, because it is saving the space and resources by not creating a duplicate file since it understands that it only differs by name.
We now push it to the registry:
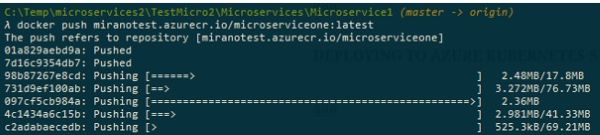
As you can see, we just execute the command push with the full name of the image, and then the upload starts. You will see different layers being pushed simultaneously, to save the time, but still it can take some time depending on your upload speed.
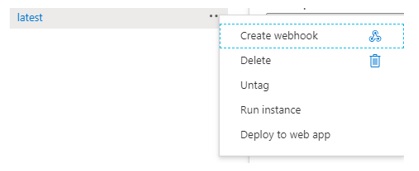
After the push is completed, go to the Azure portal and click on the Repositories now, you should see the image there. Click on it, a new blade will open to the right, now click on the tag latest and you should see something like this:
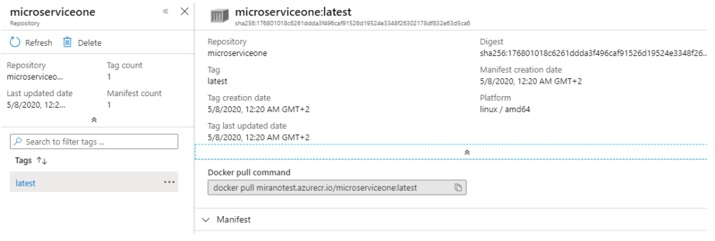
This is our image that is available from the Azure Container Registry. This registry is not only used to store the images, we can also run the container instances based on the images located here. Let us do just that…please click on the three dots to the right side of the tag that currently reads latest, and then select Run Instance:
This will open a new blade allowing us to specify the settings for the new container instance:
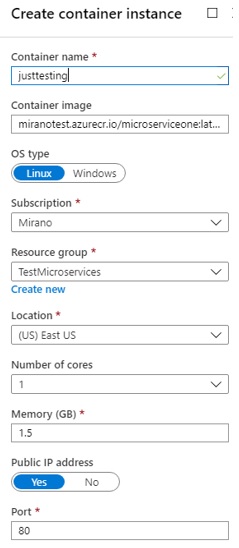
Create this instance, it should take around 30-40 seconds, and then you would get a new container instance like this:
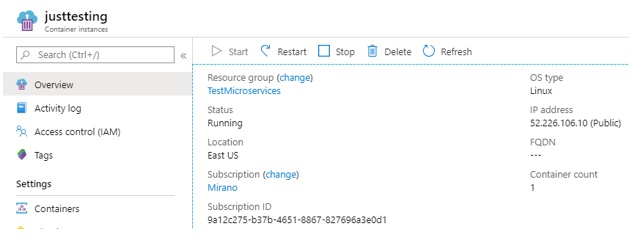
Please note the public IP address of this container instance….let us try to send a GET request to this endpoint:
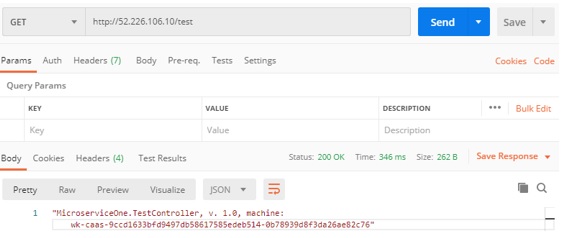
As we can see, everything is working, the same way it was working locally, just now in Azure as a container instance. It is very easy to create the instance based on the image in the ACR, and this is a great way of spinning off and running the containers and share it between the teams.
Since we are not going to be using this instance, please delete it (the container instance, not the image in ACR, that one we are going to need for later).
PROVISIONING AZURE KUBERNETES SERVICES (AKS)
The next service we need is the Azure Kubernetes Service. The tricky part here is that we need to specify the trust between ACR and AKS, so when the AKS starts to spin off the containers and tries to access the image from ACR, it will allow it to do so.
So the steps are:
- Log in to your azure subscription using az login,
- Log in to your container registry using az acr login,
- Create service principal,
- Provision Azure Kubernetes Services, specifying the service principal.
- Get credentials for AKS and deploy the service to it.
Buy far the easiest way is to use the command line, so let us begin:

After az login the browser will open allowing us to log in into our Azure subscription.
After we get the notification that we are logged in, if we have multiple subscriptions we should set the proper one….so we can use az account list to show all subscriptions, then az account set –subscription [subscription-id] to set the proper subscription. It is very important that you set a default subscription properly, if you have multiple subscriptions.
We have logged in to the Azure Container Registry earlier. If you have abandoned your session or have interrupted it, please make sure you are logged in into your ACR again:

This was already shown in the previous step when we needed to login to the ACR in order to be able to push our image to it, so if anything is unclear then please double check the previous section.
The next step is to created the Service Principal for AKS. The same way we can create the identity for users, we can also create the identity for the service, which is called service principal. We do that by using the RBAC or role-based access control, by executing the command az ad sp create-for-rbac:
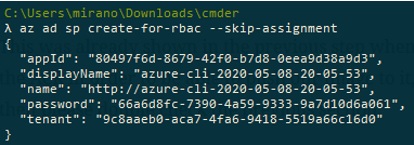
Please copy the appId and password from the information that has been returned, we will need it later.
We now need to display the information about the Azure Container Registry, in order to get the id of the registry from there, so we need to execute the command az acr show –name miranotest:

Please note the id key, we will need its value, so please make sure you copy its value for later use.
The next we create the role assignment, so as to assign the Reader role to the service principal we created earlier, for the scope of the ACR that we have retrieved in the previous step (see the previous image):

Now when we have the service principal and it has been assigned the role of the reader to the scope of the ACR that it will eventually access, we now create the Azure Kubernetes Services like this:

As we can see above, we give it the name, the node count, and also assign the service principal id and the secret that we have received when service principal was created earlier. After this, the provisioning of AKS will start and it will take between 20-40 minutes. After that, you can check the portal and the newly created AKS.
DEPLOYING TO AZURE KUBERNETES SERVICES
We now have both ACR and AKS created and configured, and the image of our service was pushed to the ACR.
In the previous post we have created a deployment to Kubernetes by typing the commands directly using the Kubernetes CLI, but this time we will try to improve a bit on this and use the yaml file to specify the details, and then we will use those specifications to make a deployment and create the service.
Let us go to the project, and let us add to files to the Microservice1 folder, same place where the Dockerfile is located in, named kubedeployment.yml and kubedeploymentservice.yml.
Yaml files are regular text files, so you can created them as such. Now the kubedeployment.yml file should look like this:
apiVersion: apps/v1
kind: Deployment
metadata:
name: microserviceone
spec:
replicas: 3
selector:
matchLabels:
app: microserviceone
version: v1.0
template:
metadata:
labels:
app: microserviceone
version: v1.0
spec:
containers:
- name: microserviceone
image: miranotest.azurecr.io/microserviceone:latest
ports:
- containerPort: 80
We do not have time now to discuss the yaml file format. It suffice to say that the indentation is very important, and it basically has just two key types: regular key and a corresponding value, but also a list that starts with a dash.
If you are typing this by hand, please make sure that you do not make indentations with tab, as it will create a \t character, and this is not allowed, so your best bet is to just use two spaces or something like that to indent the line, and then be consistent to use the same throughout the file. Or just check the code repo of this blog and copy-paste the content of this file.
Please also note that the for the kind we have specified Deployment, and for the image we have set the image we pushed to the ACR in an earlier step.
Then we also need to create the kubedeployment-service.yml file, with this content:
apiVersion: v1
kind: Service
metadata:
name: microserviceone
spec:
selector:
app: microserviceone
ports:
- port: 80
protocol: TCP
type: LoadBalancer
Please note that the kind key is this time set up to Service, and the type is set to LoadBalancer, not NodePort as when we were using the local Kubernetes, since now we have this option in the Azure cluster.
There are many configuration settings that can be set in yaml files, please consult the Kubernetes documentation online for the full list.
One last thing before we can make a deployment using the yaml file, we need to get the credentials. The credentials are stored in the config file in the .kube folder, so you can find it like this: %homepath%.kube, or in command prompt you can go use kubectl config view:
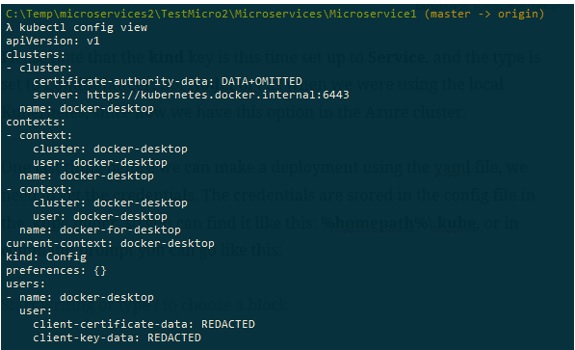
Since we only used a local Kubernetes node, this is why we only have a local cluster and a context for the local docker desktop.
We now need to pull the certificates and credentials for the Azure Kubernetes Services, which can be done by using the command az aks get-credentials and specifying the resource group and the cluster name:

The credentials are now merged to the local config file…let us now pull the config file again by using kubectl config view:
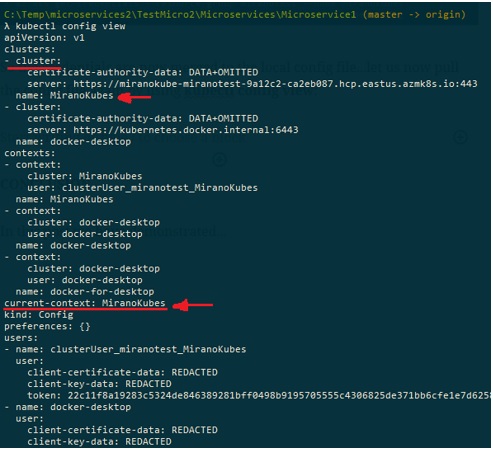
As shown in the image above, the new cluster is added to the configuration, and the current context is set to point to the AKS….so if we now execute the command kubectl get nodes, this is what gets returned:

It is clear that we are now looking at the nodes we have specified to be created with the provisioning of the AKS.
Please change directory to the location where the kubecdeployment.yaml is located in, and then we should start a deployment by invoking the following command:

It is very easy to start a deployment, we just apply the configuration set in the yml file. Since the deployment had been created, let us now see this deployment in Azure Kubernetes Services, by using the command kubectl get deployments:

As we can see, the deployment seems to went fine, and there are now 3 replicas running. Let us then check the pods:

So very similar what we have we done in the previous blog, when we created a deployment in the local Kubernetes cluster.
The deployment is now created, but we also need to create the service in order to be able to access these containers from the outside. We do that by applying the configuration we have set up in the kubedeployment-service.yml file:

If we check now the services, we should see something like this:

We can see the service for the local Kubernetes cluster, but also the one for the service microserviceone we have deployed in the earlier step. Please also note that now the type is set to LoadBalancer and we have the external IP address….so we would not use the 31799 port as specified above (remember, we are not “sitting” on the box in Azure, the same way we are “sitting” on our local cluster), but we need to use the 52.188.223.126 ip address for accessing our containers from the outside.
Let us then test it in the Postman:
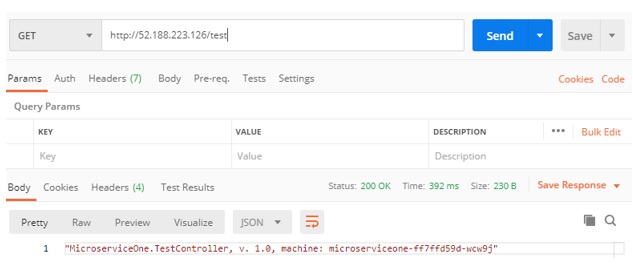
Sure enough, it works. We can access our service running in one of the containers deployed to Azure Kubernetes Services.
CONCLUSION
In this post we have demonstrated how to create Azure Container Registry and then how to push the local image to it. Then we have provisioned the Azure Kubernetes Services by specifying the service principal, enabling it to access the images from the ACR.
After that, we have demonstrated using the local yaml files to specify all the parameters needed for deployment, and then also to create the Kubernetes service in order to be able to route the traffic to the Kubernetes containers.
