

It is really easy to create windows services from console applications by using this great framework, and this article is about that. The point being that creating and debugging the console application is much easier then with the full-blown windows service project. In this article I am actually going to give you a template for creating the windows service using Topshelf framework, with all the common features you might need when creating such services, namely:
• this template has everything needed for you to start adding the business related code, not worrying about anything else, • shows how to use Topshelf to configure run-time parameters, • demonstrates usage of Autofac to pull in the dependencies, • has simple logging included, • shows usage of the configuration settings file, • gives the sample class that can be used to run the actual workload.
If you want to read more about this framework, you can find the information here: http://topshelf-project.com
And if you want to access the project template, you can clone it from this repository: https://github.com/mirano-galijasevic/TopShelfTemplate
SAMPLE PROJECT
I will quickly run through the project, and explain the major points. But before that, let’s just say that the .Net Core console application creates the .dll file, and we need the .exe file in order to create the windows service. This is why we need to execute the following command after we build the project (from within the root folder where the .scproj file is located):
dotnet publish TopShelfTemplate.csproj -r win-x64
After you run this command from the command prompt, it will create the folder with the console .exe file, something like this:

Figure 1.1: Console .exe file
Please note above the path to the published file. The template project already includes the .bat file with this command in the root of the solution, so after building the project you do not have to run this command yourself, just go to the solution root and double-click the publish.bat file (see figure 1.2. below).
The project itself is the .Net Core console application, and I have added the following nuget packages:
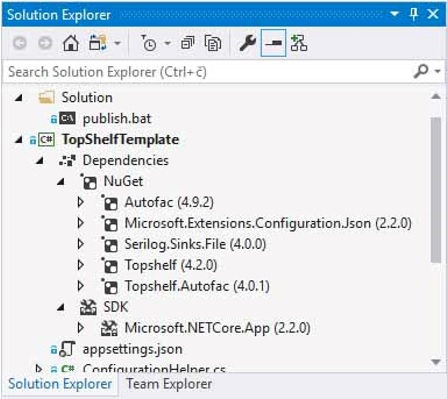
Figure 1.2: Nuget packages
Please add the same Nuget packages as shown above in the image, if you are creating the project from scratch by following this article.
Now let’s examine the Programs.cs:
static void Main( string[] args )
{
    TopshelfExitCode exitCode;

    try
    {
        string logLocation = ConfigurationHelper.Instance
            .GetConfigurationValue( "Logging:LogLocation" );

        Log.Logger = new LoggerConfiguration()
            .WriteTo.File( logLocation )
            .CreateLogger();

        exitCode = ConfigureService.Configure();
    }
    catch( Exception ex)
    {
        Log.Information( ex, "Error in Program.Main()" );
        throw;
    }

    Environment.ExitCode = ( int )Convert.ChangeType(
        exitCode, exitCode.GetTypeCode() );
}
This is the starting point of the console application, and here we are using the configuration file in line 7 to get the configuration value (more on that in just a moment), and then in line 10 we create a Serilog logger that will be used throughout the application for logging purposes.
Now little bit about the configuration file: the challenge is that the configuration file will actually be created in the publish folder (if you selected “Copy Always” or “Copy if Newer” in the properties for appsettings.json file), but then when the windows service installs it will be copied to the windows\system32\ folder, and the settings file will not be accessible any more. We are using a class that wraps the configuration file, called ConfigurationHelper, and you can see it here:
private ConfigurationHelper()
{
    var pathToOriginalExe = Process.GetCurrentProcess().MainModule
        .FileName;
    var pathToContentRoot = Path.GetDirectoryName( pathToOriginalExe );

    var builder = new ConfigurationBuilder()
        .SetBasePath( pathToContentRoot )
        .AddJsonFile( "appsettings.json",
        optional: false, reloadOnChange: true );

    _configurationRoot = builder.Build();
}
This class is implemented as Singleton, in order to avoid creating the same object all over again when we need to access the configuration, and also properly access the configuration object in order to not allow multiple threads to access it in the same time. Probably not very useful now since there will be no writing to the file, but since I cannot foresee what people will be using it for it made sense to be on the safe side and handle any threading issues appropriately.
In any case, if we look at the private constructor of the class above, we can see that the code actually sets the base path to the original root folder by looking up the current process and its root directory, in order to have the correct path to the json file which will not be copied to the windows\system32 folder when the service gets installed.
The method GetConfigurationValue(string) of the same class is then used to fetch the value to the caller after being supplied the key value, so very simple.
Now if we look back to Program.cs, in line 14 we have a call to ConfigureService.Configure(), that actually uses the Topshelf framework to configure the service as a windows service. This is all there is for Programs.cs class.
Now onto ConfigureService class, in the Configure method:
var containerBuilder = new ContainerBuilder();
containerBuilder.RegisterType<RealWork>().As<IAmDoingRealWork>();
containerBuilder.RegisterType<MyService>();

var container = containerBuilder.Build();

exitCode = HostFactory.Run( x =>
{
    x.UseAutofacContainer( container );

    x.Service<MyService>( hostSettings =>
    {
        hostSettings.ConstructUsing( () =>
        container.Resolve<MyService>() );

        hostSettings.WhenStarted( s => s.StartService() );
        hostSettings.WhenStopped( s => s.StopService() );
    } );

    x.RunAsLocalSystem();
    x.StartAutomatically();

    x.SetServiceName( "TopshelfTemplateService" );
    x.SetDisplayName( "TopshelfTemplateService" );
    x.SetDescription( "TopshelfTemplateService" );
} );
This is where we configure this application to run as a windows service. Everything is pretty simple, we use HostFactory.Run to configure the service, and set the way on how it will run, what the service names will be, whcih account it would use, which methods will be called when the Service Control Manager (SCM) receives the start or stop events….there are more settings, or course, please check the Topshelf documentation.
Now interesting here is line 13, where we instruct Topshelf to create the service. The class we would like to create the object for, and then run it, is called MyService, and if you look into that class it implements the interface IService, which just makes sure the class will implement StartService() and StopService() methods, very simple stuff. However, you may also notice that this class expects the object that implements the interface IAmDoingRealWork in the constructor, and that is why we cannot just make this line to read:
hostSettings.ConstructUsing( () => new MyService() );
as this would not work. This class expects the parameter in its constructor of type IAmDoingRealWork, so this won’t even compile. We therefore create the container using Autofac in lines 1-5, so that we can request the container to resolve the type MyService and its dependency.
So far so good…now let’s look the actual implementation of the MyService class. It receives the object of class that implements the IAmDoingRealWork interface, as resolved by Autofac IoC container, and then goes on to actually start the execution in its StartService method. Please note that it passes the ManualResetEvent object as well, so that when the SCM calls to stop the service, it can then signal the class to stop executing, in order to have a cleanup if needed and graceful shutdown.
The RealWork class is where the actual work happens…without going into too many details, the class is pretty simple and it just starts the new thread and loops there until it receives either internal or the external signal to stop. Everything else is just handling the shutdown gracefully, more or less. The main method that does the work is ThreadFunction, that does this:
private void ThreadFunction()
{
    waitHandles = new[] { _externalResetEvent, _internalResetEvent };

    while( true )
    {
        if (WaitHandle.WaitAny( _waitHandles, _scanFrequency, false ) != WaitHandle.WaitTimeout)
        {
            Log.Information( "RealWork received signal to stop." );
            return;
        }

        // TODO: Now do some real work here...
        Log.Information( "In RealWork, doing some real work here..." );
    }
}
So it runs in an endless loop, until the signal is received either internally, or externally coming from the SCM and through the MyService service to stop the execution.
Of course, this is just a proposed template, but I imagine it would suite many actual implementations of windows services, as one would usually want to execute the code that runs in a loop and periodically checks on something, such as an event, new value in some table, if there are new messages on some message queue, or similar, and then to execute some concrete business logic.
To install the service, you need to:
- build the project first,
- go to the solution root, and run the publish.bat file, to create the .exe file,
- go to the publish folder (usually something like bin\debug\netcoreapp2.2, and then something like win-x64 folder (depending on the command),
- open the command prompt in that folder (as an admin) and run this:
TopShelfTemplate.exe install
and Topshelf will install the service, in line with the configuration settings it has been given in the ConfigureService.Configure() method, as explained above.
CONCLUSION
Using Topshelf really helps to leave all the details about creating the windows service project to the Topshelf framework, so that we can use a simple console application to write the actual code with easy debugging capabilities, and focusing on solving the real world business challenges.
