

WHY DAPPER
Data access is arguably one of the most important facets of software engineering, and we just cannot do without it. Most of the application use data this way or another, so there is no application building without being very efficient when dealing with data. That’s why most of us had some different experiences with it, sometimes pleasant and sometimes not so pleasant, and most of us have formed our own opinion about it. Not many senior developers will say they did not care about data access, but rather they would have very strong opinions when it comes to this matter.
I have to admit I was always leery toward using ORMs and especially Entity Framework, which is Microsoft’s data access technology of choice. The moment I started using EF it felt as if had to wade through a lot of unknown territory, with results yet to be seen and evaluated. It just felt wrong from the very beginning.
The good thing is that there are many others who feel the same way about ORMs the way I do, hence the Dapper was created. It was created by Sam Saffron for the purpose of being the main data access tool for StackOverflow. We all know what the StackOverflow is, right? And we all know how much data it has to deal with at every second of the day. Notwithstanding all this, we cannot really directly compare EF to Dapper, since Dapper only represents an extension to the IDBConnection that is part of the ADO.Net. So it is really as simple as that: ADO.Net is very fast and very reliable, and most of us have been using it from the very beginning of the .Net (year 2000 or 2001, if I remember correctly), and Dapper just extends the IDBConnection with many useful extension methods.
Really the only downside of the ADO.Net was that you had to write that pesky plumbing code to send the request to the server or to build up the parameters, and then get back the data in DataTable or some sort of DataReader, then you had to map all that by iterating the result set and manually do the mapping and checking for nulls and such. Very tedious and error prone as well, not to mention writing too much code, and after a while that all starts to look very boring and inefficient indeed.
SAMPLE APPLICATION
I do not believe in quick and dirty examples, as I think if you want to demonstrate something then it should be done in a proper and clear way. For that matter, I am going to build the application that will consist of three projects: database project, class library and test projects. Database projects will help us create our database, schema and data as well, the class library will help us abstract the repository for accessing database and the test projects will run tests from where we will call into the repository to manipulate data.
I strongly suggest you to open up Visual Studio and follow step by step, as this would be the best way to understand the topics discussed, however if you do not have time and you just want to look into it, I have created a repo at this location, so please feel free to clone it:
https://github.com/mirano-galijasevic/DapperTest
Now, I will also add a little bit about using XUnit for unit testing, issues people have with using the configuration in .Net Core projects, and also we’ll be using a database project to create our database.
Let’s fire up the Visual Studio, I am currently using version 2017 v. 15.9.2, and start with coding.
Database Project
Let’s just create a new Database project….so just go Add -> New -> Projects -> and then search for SQL Server Database Project. When you find a template, name the project “Database”, select “Create New Solution” in a dialog, check “Create directory for solution” and then click OK. This should have created a new Database project now.
We are going to use this project to create our Database. For this demo, I will be using a local db, so please go to View menu and select “SQL Server Object Explorer”. This should open a new pane, make sure you have it by side and pin it, as we’ll be using it quite a bit. Over there, you should see SQL Server node and then (localdb)\MSSQLLocalDB below it…axpand it further, and then you would see databases on this server. This is where we are going to create our database.
So go to the solution explorer, right click on Database project and then Add -> New Folder and add folder name “Tables”. Add another folder named “StoredProcedures”.
Right click again on Tables folder that you have created, go to Add -> Table… and then name it “Contacts” and then click Add button. This should have opened a table design view, now copy/paste the code below into the lower pane where T-SQL is (overwriting the template SQL that was created by default):
CREATE TABLE [dbo].[Contacts] (
    [Id]        INT          IDENTITY (1, 1) NOT NULL,
    [FirstName] VARCHAR (50) NULL,
    [LastName]  VARCHAR (50) NULL,
    [Email]     VARCHAR (50) NULL,
    [Company]   VARCHAR (50) NULL,
    [Address] INT NULL,
    CONSTRAINT [PK_Contacts] PRIMARY KEY CLUSTERED ([Id] ASC)
);
For all examples in this article, you can also go to the code repository that I have given you a link above and copy the code from there. The structure of the projects as well as of the solution will be exactly the same.
Remember to save the table (CTRL-S or Save button on the menu), after it has been created. As you can see, it is a very simple table of contacts, with one Id that is Identity and an Address id that will relate to the Address table we are going to create as well.
Now again the same, right click on Tables folder, Add -> Table….and name this table States. Now after it has been created, copy/paste this code:
CREATE TABLE [dbo].[States] (
    [StateId]        INT          NOT NULL,
    [StateName] VARCHAR (50) NOT NULL,
    CONSTRAINT [PK_States] PRIMARY KEY CLUSTERED ([StateId] ASC)
);
Okay, now we have the States table as well. Do the same once more and create the table Addresses, and copy/paste this SQL code, then save the table (CTRL-S or Save button on the menu):
CREATE TABLE [dbo].[Addresses] (
    [Id]            INT          IDENTITY (1, 1) NOT NULL,
	[ContactId]		INT NOT NULL,
    [AddressType]   VARCHAR (10) NOT NULL,
    [StreetAddress] VARCHAR (50) NOT NULL,
    [City]          VARCHAR (50) NOT NULL,
    [StateId]       INT          NOT NULL,
    [PostalCode]    VARCHAR (20) NOT NULL,
    CONSTRAINT [PK_Addresses] PRIMARY KEY CLUSTERED ([Id] ASC),
    CONSTRAINT [FK_Addresses_Contacts] FOREIGN KEY ([ContactId])
        REFERENCES [dbo].[Contacts] ([Id]) ON DELETE CASCADE,
    CONSTRAINT [FK_Addresses_States] FOREIGN KEY ([StateId])
        REFERENCES [dbo].[States] ([StateId])
);
Now we have our 3 tables, please look at them briefly. The Contacts table that has a foreign key to the Addresses table, and Addresses table has a foreign key in States table. This is very simple schema, and just what we need to show the Dapper capabilities.
Let us now add stored procedures and then some data as well, so that our Database can be pre-populated with it. Right click on StoredProcedures folder, then Add -> Stored Procedure…and name it “Contacts_Del”, and click OK button.
The new stored procedure is created, and now just copy/paste the following code over the one that template has created:
CREATE PROCEDURE [dbo].[Contacts_Del]
	@contactId int
AS
	delete Contacts where Id = @contactId
RETURN 0
We will use this SP later for deleting contacts. Create another stored procedure, same process, name it “CreatePOCOs”, and copy/paste this code:
/* https://gist.github.com/joey-qc/6710702 */

CREATE PROCEDURE [dbo].[CreatePOCOs]
AS
	declare @tableName varchar(200)
	declare @columnName varchar(200)
	declare @nullable varchar(50)
	declare @datatype varchar(50)
	declare @maxlen int

	declare @sType varchar(50)
	declare @sProperty varchar(200)

	DECLARE table_cursor CURSOR FOR
	SELECT TABLE_NAME
	FROM [INFORMATION_SCHEMA].[TABLES]

	OPEN table_cursor

	FETCH NEXT FROM table_cursor
	INTO @tableName

	WHILE @@FETCH_STATUS = 0
	BEGIN

	PRINT 'public class ' + @tableName + ' {'

		DECLARE column_cursor CURSOR FOR
		SELECT COLUMN_NAME, IS_NULLABLE, DATA_TYPE, isnull(CHARACTER_MAXIMUM_LENGTH,'-1')
	  from [INFORMATION_SCHEMA].[COLUMNS]
		WHERE [TABLE_NAME] = @tableName
		order by [ORDINAL_POSITION]

		OPEN column_cursor
		FETCH NEXT FROM column_cursor INTO @columnName, @nullable, @datatype, @maxlen

		WHILE @@FETCH_STATUS = 0
		BEGIN

		-- datatype
		select @sType = case @datatype
		when 'int' then 'Int32'
		when 'decimal' then 'Decimal'
		when 'money' then 'Decimal'
		when 'char' then 'String'
		when 'nchar' then 'String'
		when 'varchar' then 'String'
		when 'nvarchar' then 'String'
		when 'uniqueidentifier' then 'Guid'
		when 'datetime' then 'DateTime'
		when 'bit' then 'Boolean'
		else 'String'
		END

			If (@nullable = 'NO')
				PRINT '[Required]'
			if (@sType = 'String' and @maxLen <> '-1')
				Print '[MaxLength(' +  convert(varchar(4),@maxLen) + ')]'
			SELECT @sProperty = 'public ' + @sType + ' ' + @columnName + ' { get; set;}'
			PRINT @sProperty

			print ''
			FETCH NEXT FROM column_cursor INTO @columnName, @nullable, @datatype, @maxlen
		END
		CLOSE column_cursor
		DEALLOCATE column_cursor

		print '}'
		print ''
		FETCH NEXT FROM table_cursor
		INTO @tableName
	END
	CLOSE table_cursor
	DEALLOCATE table_cursor
RETURN 0
This code, when executed, iterates through all tables in the database and creates POCO classes, that you can then copy/paste and create classes in your C# projects. A real time saver, and we’ll use it later on.
Now finally, we want to create a script that will execute after we create all these database objects, and populate the database with data. So go to the root of the Database project, Add -> Script…. and now make sure you select “Post-Deployment Script” and give it any name you want to, or leave the default name, then click the Add button.
The script should have been created now, the next step is to copy/paste the following code (or get it from https://github.com/mirano-galijasevic/DapperTest/tree/master/Database if easier for you) to this script and then save it:
/***** SEED DATA FOR STATES TABLE *****/
INSERT [dbo].[States] ([StateId], [StateName]) VALUES (1, N'Alabama')
INSERT [dbo].[States] ([StateId], [StateName]) VALUES (2, N'Alaska')
INSERT [dbo].[States] ([StateId], [StateName]) VALUES (4, N'Arizona')
INSERT [dbo].[States] ([StateId], [StateName]) VALUES (5, N'Arkansas')
INSERT [dbo].[States] ([StateId], [StateName]) VALUES (6, N'California')
INSERT [dbo].[States] ([StateId], [StateName]) VALUES (8, N'Colorado')
INSERT [dbo].[States] ([StateId], [StateName]) VALUES (9, N'Connecticut')
INSERT [dbo].[States] ([StateId], [StateName]) VALUES (10, N'Delaware')
INSERT [dbo].[States] ([StateId], [StateName]) VALUES (11, N'District of Columbia')
INSERT [dbo].[States] ([StateId], [StateName]) VALUES (12, N'Florida')
INSERT [dbo].[States] ([StateId], [StateName]) VALUES (13, N'Georgia')
INSERT [dbo].[States] ([StateId], [StateName]) VALUES (15, N'Hawaii')
INSERT [dbo].[States] ([StateId], [StateName]) VALUES (16, N'Idaho')
INSERT [dbo].[States] ([StateId], [StateName]) VALUES (17, N'Illinois')
INSERT [dbo].[States] ([StateId], [StateName]) VALUES (18, N'Indiana')
INSERT [dbo].[States] ([StateId], [StateName]) VALUES (19, N'Iowa')
INSERT [dbo].[States] ([StateId], [StateName]) VALUES (20, N'Kansas')
INSERT [dbo].[States] ([StateId], [StateName]) VALUES (21, N'Kentucky')
INSERT [dbo].[States] ([StateId], [StateName]) VALUES (22, N'Louisiana')
INSERT [dbo].[States] ([StateId], [StateName]) VALUES (23, N'Maine')
INSERT [dbo].[States] ([StateId], [StateName]) VALUES (24, N'Maryland')
INSERT [dbo].[States] ([StateId], [StateName]) VALUES (25, N'Massachusetts')
INSERT [dbo].[States] ([StateId], [StateName]) VALUES (26, N'Michigan')
INSERT [dbo].[States] ([StateId], [StateName]) VALUES (27, N'Minnesota')
INSERT [dbo].[States] ([StateId], [StateName]) VALUES (28, N'Mississippi')
INSERT [dbo].[States] ([StateId], [StateName]) VALUES (29, N'Missouri')
INSERT [dbo].[States] ([StateId], [StateName]) VALUES (30, N'Montana')
INSERT [dbo].[States] ([StateId], [StateName]) VALUES (31, N'Nebraska')
INSERT [dbo].[States] ([StateId], [StateName]) VALUES (32, N'Nevada')
INSERT [dbo].[States] ([StateId], [StateName]) VALUES (33, N'New Hampshire')
INSERT [dbo].[States] ([StateId], [StateName]) VALUES (34, N'New Jersey')
INSERT [dbo].[States] ([StateId], [StateName]) VALUES (35, N'New Mexico')
INSERT [dbo].[States] ([StateId], [StateName]) VALUES (36, N'New York')
INSERT [dbo].[States] ([StateId], [StateName]) VALUES (37, N'North Carolina')
INSERT [dbo].[States] ([StateId], [StateName]) VALUES (38, N'North Dakota')
INSERT [dbo].[States] ([StateId], [StateName]) VALUES (39, N'Ohio')
INSERT [dbo].[States] ([StateId], [StateName]) VALUES (40, N'Oklahoma')
INSERT [dbo].[States] ([StateId], [StateName]) VALUES (41, N'Oregon')
INSERT [dbo].[States] ([StateId], [StateName]) VALUES (42, N'Pennsylvania')
INSERT [dbo].[States] ([StateId], [StateName]) VALUES (44, N'Rhode Island')
INSERT [dbo].[States] ([StateId], [StateName]) VALUES (45, N'South Carolina')
INSERT [dbo].[States] ([StateId], [StateName]) VALUES (46, N'South Dakota')
INSERT [dbo].[States] ([StateId], [StateName]) VALUES (47, N'Tennessee')
INSERT [dbo].[States] ([StateId], [StateName]) VALUES (48, N'Texas')
INSERT [dbo].[States] ([StateId], [StateName]) VALUES (49, N'Utah')
INSERT [dbo].[States] ([StateId], [StateName]) VALUES (50, N'Vermont')
INSERT [dbo].[States] ([StateId], [StateName]) VALUES (51, N'Virginia')
INSERT [dbo].[States] ([StateId], [StateName]) VALUES (53, N'Washington')
INSERT [dbo].[States] ([StateId], [StateName]) VALUES (54, N'West Virginia')
INSERT [dbo].[States] ([StateId], [StateName]) VALUES (55, N'Wisconsin')
INSERT [dbo].[States] ([StateId], [StateName]) VALUES (56, N'Wyoming')

/***** SEED DATA FOR CONTACTS TABLE *****/
INSERT INTO [Contacts] VALUES
    ('Giacomo','Stewart','Curabitur@erosturpis.com','Lacus Consulting', 1);
INSERT INTO [Contacts] VALUES
    ('Whilemina','Morris','vel.arcu.eu@Cras.org','Aenean Egestas Hendrerit Foundation', 2);
INSERT INTO [Contacts] VALUES
    ('Germane','Cochran','dolor@ullamcorpermagnaSed.ca','Pharetra Ut Pharetra Corporation', 3);
INSERT INTO [Contacts] VALUES
    ('MacKenzie','Black','a@Craseutellus.org','Mi Associates', 4);
INSERT INTO [Contacts] VALUES
    ('Vincent','Roach','elit.pellentesque.a@ipsumdolor.org','Nunc Ut Corp.', 5);
INSERT INTO [Contacts] VALUES
    ('Cara','Leblanc','volutpat@Vivamus.ca','Magnis Dis LLC', 6);

/***** SEED DATA FOR ADDRESSES TABLE *****/
INSERT INTO [Addresses] VALUES(1, 'Work', '1901 W Madison St', 'Chicago', 17, '60612');
INSERT INTO [Addresses] VALUES(2, 'Home', '8654 Sem, St.', 'Miami', 12, '33101');
INSERT INTO [Addresses] VALUES(3, 'Home', '9397 Lorem St.', 'Los Angeles', 6, '90001');
INSERT INTO [Addresses] VALUES(4, 'Home', '6509 Velit. Rd.', 'Oklahoma City', 40, '73101');
INSERT INTO [Addresses] VALUES(5, 'Home', '3395 Sagittis Avenue', 'Cleveland', 39, '44101');
INSERT INTO [Addresses] VALUES(6, 'Home', '2119 Orci Street', 'Los Angeles', 6, '90003');
This completes all we need for creating a database, so let’s create it now. Right click on Database project and build it, then again right click, and go Publish….this will open a new dialog window.
Click on Edit…. Button, then Browse, expand Local and select the MSSQLLocalDB. Now click OK and you’ll be back in the previous dialog….type in “TestDapper” as Database name, leave everything else as is, and click on Publish button. You can track the publishing process in the Data Tools Operation pane, and it should complete successfully. If not, then please go to ViewResults in this pane and see what is wrong. It will point you the exact script that failed, and the exact line on where the failure occurred.
Now plase go to SQL Server Object Explorer, right click the Database folder and then click on Refresh. The “TestDapper” database should be there, now expand it and see the tables and stored procedures created as well. Right click on Contacts table -> View Data….and you should see the data in a new tab view.
If you would like to change something in the Database project, then you can again do the Publishing, just make sure you go to the Advanced section and either select objects to drop and re-create (lots of options there) or just click on “Always re-create database”, if you can afford to lose the data in the database, or you have a separate scripts that always take care of the data fixes.
In any case, this is all about the database project, and it should look something like this:
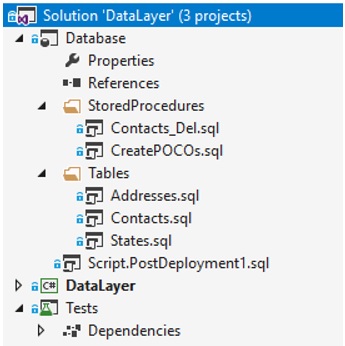
Figure 1.1: Database Project
Test Project
Now please right click on the solution, then Add -> New Project -> .Net Core, and select xUnit Test Project (.Net Core). Name it Test, and then click OK to create it. Now right click a default unit test file that was created, and delete it.
In this project we are going to create unit tests that we can execute, but we are not going to work with Dapper here. We want to create a repository in a separate class library that will do all the work with Dapper, so that we can just focus on creating unit tests here, where they belong.
Strictly speaking, these tests are not going to be a real unit tests, and test purists would surely dismiss us for really creating integration tests, for we are going to add data to the database, modify it, delete it, etc. In a pure unit test scenario, we would be using mocks and abstract that functionality, but I believe that this is still a fare case since we are creating a demo to peek into how Dapper really works so it seems well justified.
First, we need a configuration, so that we can store a connection string there. In .Net Core it is much harder to do it then it was before when we could simply use the app or web config, and many people seem to be struggling there. The solution is not that complicated, but arguably it is much more work than before.
We will create a helper that will help us in getting to the configuration, so please right-click on the Test project, Add -> Class, and name it ConfigurationHelper.cs. Then copy/paste the following code replacing the template-created code:
using System;
using Microsoft.Extensions.Configuration;

namespace Tests
{
    public class ConfigurationHelper
    {
        /// <summary>
        /// C'tor
        /// </summary>
        public ConfigurationHelper()
        { }

        /// <summary>
        /// Get configuration root
        /// </summary>
        /// <param name="outputPath"></param>
        /// <returns></returns>
        private IConfigurationRoot GetConfigurationRoot( string basePath )
        {
            return new ConfigurationBuilder()
                .SetBasePath( basePath )
                .AddJsonFile( "settings.json", optional: true )
                .AddEnvironmentVariables()
                .Build();
        }

        /// <summary>
        /// Get TestConfiguration
        /// </summary>
        public TestConfiguration GetConfiguration( string basePath )
        {
            var configuration = new TestConfiguration();
            var iConfigRoot = GetConfigurationRoot( basePath );

            iConfigRoot
                .GetSection( "DapperTesting" )
                .Bind( configuration );

            return configuration;
        }
    }
}
As you can see, there are many errors since we have not added the configuration packages, so let’s do that. The XUnit and XUnit.Runner have already been added, since we have created the XUnit test type. Go to Tools -> NuGet Package Manager -> Package Manager Console, and install these packages (make sure the default project drop-down list is set to Test project):
Install-Package Microsoft.Extensions.Configuration
Install-Package Microsoft.Extensions.Configuration.Binder
Install-Package Microsoft.Extensions.Configuration.EnvironmentVariables
Install-Package Microsoft.Extensions.Configuration.Json
Install-Package Microsoft.Extensions.Configuration.FluentAssertions
We need these packages to work with the configuration, and FluentAssertions we would need for unit tests.
Let’s look at the code in ConfigurationHelper.cs for a bit. There is a private method GetConfigurationRoot that gets the setting file and builds it, and then there is a public method GetConfiguration that returns a TestConfiguration. This method just uses the previous private method to build the configuration and then to fetch the section from the configuration we are interested in, and then binds to it, at which point the public fields in that class will bound to whatever is in the configuration.
We are obviously missing the TestConfiguration.cs file, so please create a new class with this name, and copy/paste this code:
using System;
using System.Collections.Generic;
using System.Text;

namespace Test
{
    public class TestConfiguration
    {
        public string Connection { get; set; }
    }
}
It only has one field Connection, but you can add more fields of course. We are not interested only in storing the connection string. Now since the GetConfiguration method uses settings.json file, we need to add that as well. So add a new json file to the root of the Test project, name it settings.json, and copy/paste the following configuration to it:
{
  "DapperTesting": {
    "Connection": "Data Source=(localdb)\\MSSQLLocalDB;Initial Catalog=TestDapper;
    Integrated Security=True;Persist Security Info=False;Pooling=False;
    MultipleActiveResultSets=False;Connect Timeout=60;Encrypt=False;
    TrustServerCertificate=True"
  }
}
Click on this configuration file in Solution Explorer, go to properties, and make sure that Copy to Output Directory is set to Copy Always.
With this in place, we have everything we need to get the configuration, so let us now create a unit test to test if we can really get the configuration. Add a new class and name it ConfigurationTests.cs, and copy/paste the following code:
using System;
using System.Collections.Generic;
using System.Text;

using Xunit;
using Xunit.Abstractions;
using FluentAssertions;

namespace Test
{
    public class ConfigurationTests
    {
        /// <summary>
        /// Output
        /// </summary>
        private readonly ITestOutputHelper _output;

        /// <summary>
        /// C'tor
        /// </summary>
        public ConfigurationTests( ITestOutputHelper output )
        {
            _output = output;
        }

        [Fact]
        public void Can_Get_Configuration_Connection()
        {
            ConfigurationHelper helper = new ConfigurationHelper();
            var configuration = helper.GetConfiguration( AppContext.BaseDirectory );

            configuration
                .Should().NotBeNull( "Configuration object cannot be null" );

            configuration.Connection
                .Should().NotBeNull( "Connection string cannot be null." )
                .And.Should().NotBeSameAs( String.Empty, "Connection cannot be an empty string" );

            _output.WriteLine( $"Connection string is: {configuration.Connection}" );
        }

    }
}
You will notice that we are using XUnit, XUnitAbstractions and FluentAssertions, this is all XUnit stuff for unit testing. In the constructor we are letting XUnit to inject the ITestOutputHelper, which is used to write the output, as you cannot just Console.WriteLine or something to see the ouput, so in XUnit you use this abstraction for outputting data out of the unit test.
The test is marked with the [Fact] attribute, meaning the test is normal without any inputs, while [Theory] is if you want to supply arguments to the unit test. The code is straightforward: we use the helper to get the configuration, and then we test if the configuration is not null and also output the connection string. So, let’s build the project first, then go to Test -> Windows -> Test Explorer, and right click on Run Selected Test. It should be green, and if you click on Output then you would see a configuration string from the json file. For your reference, the test explorer should look something like this:
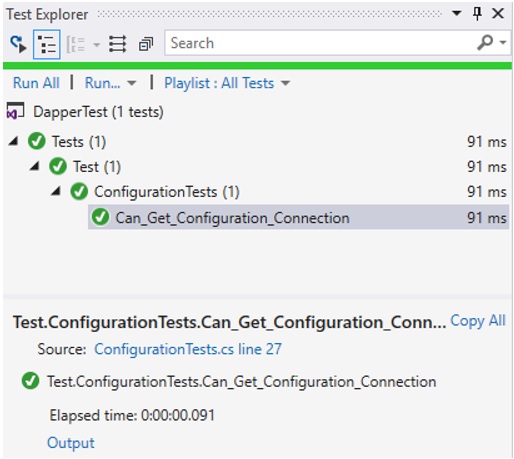
Figure 1.2: Test explorer
Now we have a working configuration, and also a working test, so we are half way there. We now need to finally start testing the Dapper functionality. Let us create a new class now, name it RepositoryTests.cs, and copy/paste the following code:
using System;
using Xunit;
using Xunit.Abstractions;

using FluentAssertions;
using System.Threading.Tasks;

namespace Test
{
    public class ContactRepositoryTests
    {
        /// <summary>
        /// Output
        /// </summary>
        private ITestOutputHelper _output;

        /// <summary>
        /// Configuration
        /// </summary>
        private TestConfiguration _configuration;

        /// <summary>
        /// C'tor
        /// </summary>
        public ContactRepositoryTests( ITestOutputHelper output )
        {
            if ( null == output )
                throw new ArgumentNullException( "output" );

            _output = output;

            ConfigurationHelper helper = new ConfigurationHelper();
            _configuration = helper.GetConfiguration( AppContext.BaseDirectory );
        }
    }
}
Nothing special here that we haven’t seen in the previous test class, we are getting the output and the configuration in the constructor and storing it later for the use in unit tests. This is not an ideal situation, as the class is created every time the unit test runs, but we are going to fix this later.
Let us now create our first test that will go to the database and fetch all six contacts. Please add a method named Get_all_should_return_6_results, and copy/paste this code:
[Fact]
public async Task Get_all_should_return_6_results()
{
// Arrange
IContactRepository repo = CreateRepository();

// Act
var contacts = await repo.GetAll();

// Assert
contacts.Should().NotBeNull();
contacts.Count.Should().Be( 6 );
}
This is a very standard way of creating unit tests, we first create the test that fails, and then we add the code to make the test pass. Very Test Driven Design, if you will. As you may have already noticed, we are using the IContactRepository that does not exist yet. So let’s add it, but let us create it in the DataLayer project. We need to add this project by adding a new project to the solution, choose .Net Core -> Class Library (.Net Core) and name it DataLayer. Remove the auto-generated Class1.cs. Now go to Tests project, right-click on Dependencies -> Add Reference….check DataLayer project and click OK to create a reference to this project.
Add new class to DataLayer project, name it IContactRepository, and copy/paste the following code:
using System;

namespace DataLayer
{
    public class Contact
    {
        public int Id { get; set; }

        public string FirstName { get; set; }

        public string LastName { get; set; }

        public string Email { get; set; }

        public string Company { get; set; }

        public int AddressId { get; set; }

        /// <returns></returns>
        public override string ToString()
        {
            return $"Id: {Id}, FirstName: {FirstName}, LastName: {LastName}, " +
                "Email: {Email}, Company: {Company}";
        }
    }
}
As you can see, this class has the same fields as the Contacts table we have created earlier.
Finally, let us create the class that will implement this interface, and where all the work will execute. Add new class to DataLayer project, name it ContactRepository, and copy/paste the following code:
using System;
using System.Collections.Generic;

using System.Data;
using System.Data.SqlClient;
using Dapper;

using System.Text;
using System.Linq;
using System.Threading.Tasks;

namespace DataLayer
{
    public class ContactRepository : IContactRepository
    {
        /// <summary>
        /// Connection string
        /// </summary>
        private readonly string _connection;

        /// <summary>
        /// C'tor
        /// </summary>
        /// <param name="connectionString"></param>
        public ContactRepository( string connectionString )
        {
            _connection = connectionString;
        }

        /// <summary>
        /// Get all contacts
        /// </summary>
        /// <returns></returns>
        public Task<List<Contact>> GetAll()
        {
            return null;
        }
    }
}
Let us briefly look at this class. Obviously, it implements the interface we have created earlier, and only one method that is specified in it. It also gets the connection string in the constructor that it stores in a private variable for later usage. We can see that we are using the Dapper namespace, so it is time to add the Dapper package….go to Tools -> NuGet Package Manager -> Package Manager Console, and add the following package (make sure you have DataLayer selected in the drop-down list for Default Project):
Install-Package Dapper
Now let’s go back to our test class, and you will still see that we are missing the CreateRepository method….so click on it and then find that little helper window below, drop-down and click to generate the method:
private IContactRepository CreateRepository()
{
return new ContactRepository( _configuration.Connection );
}
This is all we need for now, let’s see what will happen here. So we are going to execute the unit test, it will get a reference to the object that implements the IContactRepository interface, the factory method will create the object and will pas the connection string, the ContactRepository will run executing the GetAll method, and that will return null, failing the test. This is exactly what we need for now, so please rebuild the project Tests (rebuild, since it need to build the referenced project as well), then go to Test Explorer, find our unit test under RepositoryTests, and run it. It should fail.
Let us now make it work….go to ContactRepository class and method GetAll(), and copy/paste the following:
public async Task<List<Contact>> GetAll()
{
    string sql = "SELECT * FROM dbo.Contacts";

    using ( var connection = new SqlConnection( _connection ) )
    {
        var contacts = await connection.QueryAsync<Contact>( sql );
        return contacts.ToList<Contact>();
    }
}
As you can see, we are using async calls, as all calls to the database should be asynchronous, and I do not believe we should even discuss why. No calls to database should ever be synchronous, under any circumstances.
So we are first creating the SQL to get all data from Contacts table, then we are creating a connection in the using block, and then we call the Query method on connection object to fetch the data, then we return it to the caller. We use ToList just to convert the IEnumerable to List, so we can get the List to the calling unit test.
Please notice how easy it is to get the list of strongly type contacts from database in just a few lines of code. There is no preparing data or dealing with DataTables, DataReaders or such, it all gets done automatically for us. You can say that we needed to create the Contact class, but as we shall see later it is also possible to use dynamic and not to revolve around strong types at all, which further simplifies the usage of Dapper.
Before we execute this unit test again, let us add the code to output the Contacts to the standard XUnit output. Please go to RepositoryTests in Get_all_should_return_6_results method, and add the following lines to the end of the method:
foreach ( Contact c in contacts )
    _output.WriteLine( c.ToString() );
Now rebuild the Tests project and execute the unit test again in the Test Explorer….it should run successfully, and if you go below and click on the Output link, it should show something like this:
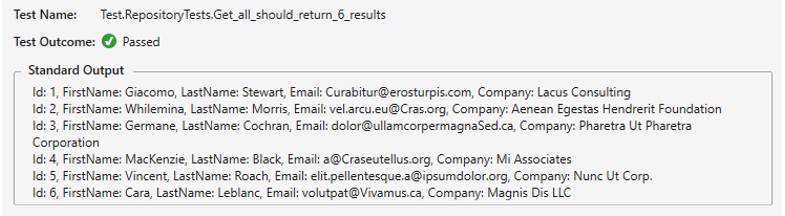
Figure 1.3: Unit test output
I hope you would appreciate the ease of working with Dapper by this time, but let’s get onto more complicated examples now. Let us see how we can insert new entities, update them, delete them etc., so all the usual work that we need to do when working with data access layers.
Yet again, since these are not really pure unit tests but more of an integration tests, I would need to order them for the purpose of executing the insert of a new entity first, then updating it and then deleting it. This must be executed in this order, and if I were to run this the way it is normally run, then all the test would execute but in random order. Since ordering should not be done in a pure unit testing scenario, there is no way to order tests and nothing in the unit testing framework that can help is in this regard. However, there is a way to do it, so let’s add these two classes to the Tests project. First one is PriorityOrderer.cs class:
using System;
using System.Collections.Generic;
using System.Linq;
using System.Text;
using Xunit.Abstractions;
using Xunit.Sdk;

namespace Tests
{
    public class PriorityOrderer : ITestCaseOrderer
    {
        public IEnumerable<TTestCase> OrderTestCases<TTestCase>(
            IEnumerable<TTestCase> testCases )
            where TTestCase : ITestCase
        {
            var sortedMethods = new SortedDictionary<int, List<TTestCase>>();

            foreach ( TTestCase testCase in testCases )
            {
                int priority = 0;

                foreach ( IAttributeInfo attr in
                 testCase.TestMethod.Method.GetCustomAttributes(
                ( typeof( TestPriorityAttribute ).AssemblyQualifiedName ) ) )
                    priority = attr.GetNamedArgument<int>( "Priority" );

                GetOrCreate( sortedMethods, priority ).Add( testCase );
            }

            foreach ( var list in sortedMethods.Keys.Select(
                priority => sortedMethods[ priority ] ) )
            {
                list.Sort( ( x, y ) => StringComparer.OrdinalIgnoreCase.Compare(
                    x.TestMethod.Method.Name, y.TestMethod.Method.Name ) );
                foreach ( TTestCase testCase in list )
                    yield return testCase;
            }
        }

        static TValue GetOrCreate<TKey, TValue>(
            IDictionary<TKey, TValue> dictionary, TKey key ) where TValue : new()
        {
            TValue result;

            if ( dictionary.TryGetValue( key, out result ) ) return result;

            result = new TValue();
            dictionary[ key ] = result;

            return result;
        }
    }
}
And the second class to add is TestPriorityAttribute.cs class:
using System;
using System.Collections.Generic;
using System.Text;

namespace Tests
{
    [AttributeUsage( AttributeTargets.Method, AllowMultiple = false )]
    public class TestPriorityAttribute : Attribute
    {
        public TestPriorityAttribute( int priority )
        {
            Priority = priority;
        }

        public int Priority { get; private set; }
    }
}
These two classes extend the interface from XUnit which helps us order the test, and then we create an attribute to use it for such cases. So please go back to our RepositoryTests class and add this on top of the class:
[TestCaseOrderer( "Tests.PriorityOrderer", "Tests" )]
This attribute helps us order the unit tests, and these two parameters point to a type and an assembly in which this class is residing in.
With this in place we can now add an attribute to our first unit test to read like this:
[Fact, TestPriority( 1 )]
public async Task Get_all_should_return_6_results()
This will make sure these tests are run in the orderly fashion.
Let us now proceed with more unit tests….let’s create a new unit test, right below the previous one:
[Fact, TestPriority( 2 )]
public async Task Find_should_retrieve_existing_entity()
{
    IContactRepository repo = CreateRepository();

    var contact = await repo.Find( 1 );

    contact.Should().NotBeNull();
    contact.Id.Should().Be( 1 );
}
This will, of course, not compile, since there is no such method on the interface, so let’s fix it by going to DataLayer project into IContactRepository class, and add this method:
/// <summary>
/// Add one
/// </summary>
/// <param name="contact"></param>
/// <returns></returns>
public async Task<Contact> Add( Contact newContact )
{
    string sql = "INSERT INTO Contacts(FirstName, LastName, Email, Company) " +
        "VALUES (@FirstName, @LastName, @Email, @Company) ";

    using ( var connection = new SqlConnection( _connection ) )
    {
        int recAffected = await connection.ExecuteAsync( sql, newContact );

        if ( recAffected == 1 )
        {
            var contact = await
                connection.QueryAsync<Contact>(
                "SELECT * FROM Contacts WHERE Email = @email", new { @email = newContact.Email } );

            return contact.FirstOrDefault();
        }
        else
            return null;
    }
}

/// <summary>
/// Update
/// </summary>
/// <param name="contact"></param>
/// <returns></returns>
public async Task<Contact> Update( Contact contact )
{
    string sql = "UPDATE Contacts SET FirstName = @firstName WHERE Id = @id";

    using ( var connection = new SqlConnection( _connection ) )
    {
        int recAffected = await connection.ExecuteAsync(
            sql, new { @id = contact.Id, @firstName = contact.FirstName } );

        if ( recAffected == 1 )
        {
            var updatedContact = await
                connection.QueryAsync<Contact>(
                    "SELECT * FROM Contacts WHERE Id = @id", new { @id = contact.Id } );

            return updatedContact.FirstOrDefault();
        }
        else
            return null;
    }
}

/// <summary>
/// Remove
/// </summary>
/// <param name="id"></param>
public async Task Remove( int id )
{
    string sql = "Contacts_Del";

    using ( var connection = new SqlConnection( _connection ) )
    {
        int recAffected = await connection.ExecuteAsync(
            sql, new { @contactId = id }, commandType: CommandType.StoredProcedure );
    }
}
Let us briefly analyze what is going on here. The first method Add inserts new entity to the database. We do it the usual way by constructing the SQL and then creating a connection object, but instead of Query we now use Execute method, and the async version of it. After we have inserted this entity, we then go to database and fetch the newly added entity for the reason that it should now have an identity added to it. Remember, when we create the Contact object it would have no id, but now when we get it from the database we would have the id and then we could check in our unit test to make sure we indeed have a saved entity.
Next, the method Update, it uses the same approach, just by sending two parameters now, and updates the existing entity. And finally, we use the Remove method to make sure we delete this entity from the database.
Please note that we have use the stored procedure in Remove method, the one we have created in our database project earlier on. The usage is very simple, as you can see, we just specify the name of the stored procedure in the SQL statement, then specify the parameter and just make sure we specified that the command type is of the stored procedure type, and Dapper will do the rest for us. Pretty neat, isn’t it?
Having these methods, we can now create the unit tests to see if this really works. Please go back to the RepositoryTests class in Tests projects, and add this private filed at the beginning of the class:
/// <summary>
/// Entity Id
/// </summary>
private int _id;
then add these 3 methods:
[Fact, TestPriority( 3 )]
public async Task Insert_should_assign_identity_to_new_entity()
{
    IContactRepository repo = CreateRepository();

    var newContact = new Contact()
    {
        FirstName = "John",
        LastName = "Doe",
        Email = "john.doe@microsoft.com",
        Company = "Microsoft"
    };

    var contact = await repo.Add( newContact );

    contact.Id.Should().NotBe( 0, "Identity should have been assigned by DB" );
    _output.WriteLine( $"New ID: {contact.Id}" );
    _id = contact.Id;
}

[Fact, TestPriority( 4 )]
public async Task Find_just_added_entity()
{
    // Arrange
    IContactRepository repo = CreateRepository();

    // Act
    var contact = await repo.Find( _id );

    // Assert
    contact.Should().NotBeNull();
    contact.Id.Should().Be( _id );
    contact.FirstName.Should().Be( "John" );
    contact.LastName.Should().Be( "Doe" );
    contact.Email.Should().Be( "john.doe@microsoft.com" );
    contact.Company.Should().Be( "Microsoft" );
}

[Fact, TestPriority( 5 )]
public async Task Modify_should_update_existing_entity()
{
    // Arrange
    IContactRepository repo = CreateRepository();

    // Act...let's just get the new contact and change his name
    var contact = await repo.Find( _id );
    contact.FirstName = "Jane";

    // Now update this contact
    var updatedContact = await repo.Update( contact );

    // Assert that the name has really changed
    updatedContact.FirstName.Should().Be( "Jane" );
}
As you can see, these 3 methods test the methods we have just created in the ContactRepository class. Now please rebuild the Tests project and run all tests, just right click on RepositoryTests and then RunSelectedTests, which will run all the tests. Make sure all tests have succeeded.
Well, they did not, did they? And why is that?
Well the reason is subtle and it has nothing to do with Dapper, but with the unit testing. Please look at the last line of the Insert_should_assign_identity_to_new_identity method, it reads like this:
_id = contact.Id;
This means we are saving the new Id to the private class variable, and then try to reuse it in the next method, but that is not going to work. The reason is that every time a unit test runs it presents a new class instance to it, and then tears it down after it finishes. So the _id will always be zero, which is the value this variable gets initialized.
To fix this, we need to somehow tell the XUnit framework to keep the context and share it between all unit tests. The way to do it is use a Fixture, which represents a shared context for all unit tests. So let us add the TestFixture.cs class to Tests project, and copy/paste the following code to it:
using System;
using DataLayer;
using Xunit.Abstractions;

namespace Tests
{
    public class TestFixture : IDisposable
    {
        /// <summary>
        /// Output
        /// </summary>
        public ITestOutputHelper Output { get; set; }

        /// <summary>
        /// Configuration
        /// </summary>
        public TestConfiguration Configuration { get; set; }

        /// <summary>
        /// Contact repository
        /// </summary>
        public IContactRepository ContactRepository { get; set; }

        /// <summary>
        /// Contact Id
        /// </summary>
        public int ContactId { get; set; }

        /// <summary>
        /// C'tor
        /// </summary>
        public TestFixture()
        { }

        /// <summary>
        /// IDisposable implementation
        /// </summary>
        public void Dispose()
        {
            // Clean up
        }
    }
}
This code keeps all objects that we want to keep around for all subsequent calls, which is why we need to wrap the output, configuration, repository and Id into this fixture. Now we also need to make sure that RepositoryTests class uses this fixture, so please change the RepositoryTests class to read like this now:
using System;
using Xunit;
using Xunit.Abstractions;

using FluentAssertions;
using System.Threading.Tasks;
using DataLayer;

namespace Tests
{
    [TestCaseOrderer( "Tests.PriorityOrderer", "Tests" )]
    public class RepositoryTests : IClassFixture<TestFixture>
    {
        /// <summary>
        /// Fixture
        /// </summary>
        private TestFixture _fixture;

        /// <summary>
        /// C'tor
        /// </summary>
        public RepositoryTests( TestFixture fixture, ITestOutputHelper output )
        {
            if ( null == fixture )
                throw new ArgumentNullException( "fixture" );

            _fixture = fixture;

            if ( null == output )
                throw new ArgumentNullException( "output" );

            _fixture.Output = output;

            ConfigurationHelper helper = new ConfigurationHelper();
            _fixture.Configuration = helper.GetConfiguration( AppContext.BaseDirectory );
        }

        [Fact, TestPriority( 1 )]
        public async Task Get_all_should_return_6_results()
        {
            // Arrange
            IContactRepository repo = CreateRepository();

            // Act
            var contacts = await repo.GetAll();

            // Assert
            contacts.Should().NotBeNull();
            contacts.Count.Should().Be( 6 );
        }

        [Fact, TestPriority( 2 )]
        public async Task Find_should_retrieve_existing_entity()
        {
            IContactRepository repo = CreateRepository();

            var contact = await repo.Find( 1 );

            contact.Should().NotBeNull();
            contact.Id.Should().Be( 1 );
        }

        [Fact, TestPriority( 3 )]
        public async Task Insert_should_assign_identity_to_new_entity()
        {
            IContactRepository repo = CreateRepository();

            var newContact = new Contact()
            {
                FirstName = "John",
                LastName = "Doe",
                Email = "john.doe@microsoft.com",
                Company = "Microsoft"
            };

            var contact = await repo.Add( newContact );

            contact.Id.Should().NotBe( 0, "Identity should have been assigned by DB" );
            _fixture.Output.WriteLine( $"New ID: { contact.Id}" );
            _fixture.ContactId = contact.Id;
        }

        [Fact, TestPriority( 4 )]
        public async Task Find_just_added_entity()
        {
            // Arrange
            IContactRepository repo = CreateRepository();

            // Act
            var contact = await repo.Find( _fixture.ContactId );

            // Assert
            contact.Should().NotBeNull();
            contact.Id.Should().Be( _fixture.ContactId );
            contact.FirstName.Should().Be( "John" );
            contact.LastName.Should().Be( "Doe" );
            contact.Email.Should().Be( "john.doe@microsoft.com" );
            contact.Company.Should().Be( "Microsoft" );
        }

        [Fact, TestPriority( 5 )]
        public async Task Modify_should_update_existing_entity()
        {
            // Arrange
            IContactRepository repo = CreateRepository();

            // Act...let's just get the new contact and change his name
            var contact = await repo.Find( _fixture.ContactId );
            contact.FirstName = "Jane";

            // Now update this contact
            var updatedContact = await repo.Update( contact );

            // Assert that the name has really changed
            updatedContact.FirstName.Should().Be( "Jane" );
        }

        [Fact, TestPriority( 6 )]
        public async Task Delete_should_remove_entity()
        {
            // Arrange
            IContactRepository repo = CreateRepository();

            // Act
            await repo.Remove( _fixture.ContactId );

            // Assert
            var deletedContact = await repo.Find( _fixture.ContactId );
            deletedContact.Should().BeNull();
        }

        /// <summary>
        /// Create repository
        /// </summary>
        /// <returns></returns>
        private IContactRepository CreateRepository()
        {
            if ( null == _fixture.ContactRepository )
                _fixture.ContactRepository = new ContactRepository(
                    _fixture.Configuration.Connection );

            return _fixture.ContactRepository;
        }
    }
}
Before running the test, if you would remember the test failed but there was probably the entity the already got added to the database, so we need to delete it. Go to the SQL Server Object Explorer, right click on TestDapper database, and then New Query. Execute the following command:
delete contacts where Id > 6
Now rebuild the Tests project and run all tests, they are to succeed now.
We have seen selecting data, inserting new data, updating and deleting data. Of course, you can do much more with it, but I am only going to demonstrate two more important aspect of Dapper, everything else can be found on Dapper web page with their tutorials.
In the previous examples we have always used a strongly type objects, which Dapper used to bind the values to, since we were careful to keep the fields in the classes exactly the same as the fields in the database. However, we can skip using the strongly type objects all together and use dynamic types, which further simplifies the usage of Dapper (and it is already very simple and efficient, in my opinion).
So let us see an example of this….please go to the DataLayer project and add the following interface:
using System;
using System.Collections.Generic;
using System.Text;
using System.Threading.Tasks;

namespace DataLayer
{
    public interface IAddressRepository
    {
        Task<dynamic> GetAll();
    }
}
and then let us add the implementation class for this interface with the following code:
using System;
using System.Collections.Generic;
using System.Data.SqlClient;
using System.Text;
using System.Threading.Tasks;
using Dapper;

namespace DataLayer
{
    public class AddressRepository : IAddressRepository
    {
        /// <summary>
        /// Connection
        /// </summary>
        private string _connection;

        /// <summary>
        /// Connection
        /// </summary>
        /// <param name="connectionString"></param>
        public AddressRepository( string connectionString )
        {
            _connection = connectionString;
        }

        /// <summary>
        /// Get all addresses
        /// </summary>
        /// <returns></returns>
        public async Task<dynamic> GetAll()
        {
            string sql = "SELECT * FROM Addresses";

            using ( var connection = new SqlConnection( _connection ) )
            {
                var contacts = await connection.QueryAsync<dynamic>( sql );
                return contacts;
            }
        }
    }
}
Constructor is pretty much the same as in the previous repository class, but you will notice that in this class we are using a method that selects all addresses from the database but does not use any Address class to populate the data to it, but instead return a dynamic result to return to the caller.
Let’s now go back to our RepositoryTests class, and add the following method at the end of it:
[Fact, TestPriority( 7 )]
public async Task Get_all_from_addresses()
{
    // Arrange
    IAddressRepository repo = new AddressRepository( _fixture.Configuration.Connection );

    // Act
    var addresses = await repo.GetAll();

    // Assert
    Assert.NotNull( addresses );

    foreach ( var address in addresses )
    {
        _fixture.Output.WriteLine( $"{address.StreetAddress}, {address.City}, {address.PostalCode}" );
    }
}
Please notice that we are going to get the Addresses here, which will be of type IEnumerable, but that would actually be the DapperRow internally, cause Dapper handles this for us….this is why we can simply iterate through this list and output the values, the way you can see up there.
Rebuild the Tests projects now, and then go and execute only Get_all_from_addresses unit test, you should get the result like this:
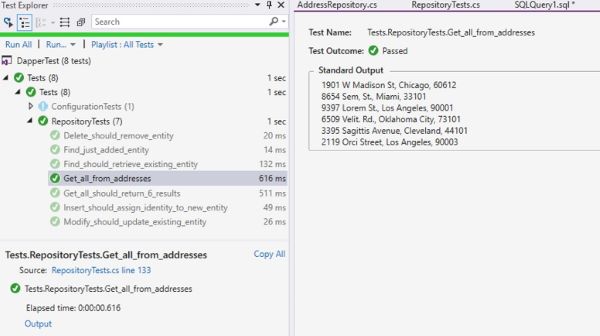
Figure 1.4: Dynamic results in unit test
I do not believe it can get any simpler than this.
Let’s do one more thing, that I believe can be very useful in every day work. You will remember that we have a list of states that is referenced from the addresses table, so what if we need to return all addresses and also the referenced state (since this is a one-to-one relationship), and package all that to the returning list? Dapper helps here as well, by allowing us to return the multi-result data.
For this we are going to use the strongly typed address and state POCO classes, but instead of typing it manually, which can be really daunting task, we would instead go to the query we have opened earlier and execute the stored procedure that we have deployed along with the database:
exec CreatePOCOs
exec CreatePOCOs This will create the classes from the existing tables…now just go and copy/paste Addresses and States and create two classes in the DataLayer project. You should have something like this:
using System;
using System.Collections.Generic;
using System.ComponentModel.DataAnnotations;
using System.Text;

namespace DataLayer
{
    public class Addresses
    {
        [Required]
        public Int32 Id { get; set; }

        [Required]
        public Int32 ContactId { get; set; }

        [Required]
        [MaxLength( 10 )]
        public String AddressType { get; set; }

        [Required]
        [MaxLength( 50 )]
        public String StreetAddress { get; set; }

        [Required]
        [MaxLength( 50 )]
        public String City { get; set; }

        [Required]
        public Int32 StateId { get; set; }

        public States State { get; set; }

        [Required]
        [MaxLength( 20 )]
        public String PostalCode { get; set; }

    }
}

using System;
using System.Collections.Generic;
using System.ComponentModel.DataAnnotations;
using System.Text;

namespace DataLayer
{
    public class States
    {
        [Required]
        public Int32 StateId { get; set; }

        [Required]
        [MaxLength( 50 )]
        public String StateName { get; set; }

    }
}
Now let us add an additional method to the IAddressRepository, here’s the code:
Task<List<Addresses>> GetAddressesAndStates();
and then add the implementation method to the AddressRepository class:
/// <summary>
/// Get addresses and states
/// </summary>
/// <returns></returns>
public async Task<List<Addresses>> GetAddressesAndStates()
{
    string sql = "select a.*, s.StateName " +
        "from Addresses a " +
        "inner join States s on a.StateId = s.StateId";

    using ( var connection = new SqlConnection( _connection ) )
    {
        var addressesAndStates = await connection.QueryAsync<Addresses, States, Addresses>(
                sql,
                ( address, state ) =>
                {
                    address.State = state;
                    return address;
                },
                splitOn: "StateName"
                );

        return addressesAndStates.AsList();
    }
}
So what does this code do? You will notice that we are now using an overload of the QueryAsync method that expects the Func that has two input parameters of types Addresses and States, and returns the Addresses object. That objects is return in lambda expression with anonymous method which is shown up there in the code, and before that all we do is we specify what is the foreign key, and everything else is done by Dapper.
Now we need to create the unit test, so please add the following unit test to RepositoryTests class:
[Fact, TestPriority( 9 )]
public async Task Get_multiple_results()
{
    // Arrange
    IAddressRepository repo = new AddressRepository( _fixture.Configuration.Connection );

    // Act
    var addresses = await repo.GetAddressesAndStates();

    // Assert
    Assert.NotNull( addresses );
}
Please add a breakpoint at the assert line up there, this is the last line of this unit test, then rebuild the Tests project, go to Test Explorer and right click on Get_multiple_results test and run it as Debug Selected Tests. When the breakpoint hits, add the addresses variable to the Watch pane, and you should see something like this:

Figure 1.5: Multiple-results list
As you can see, we have now list of States returned within a list of Addresses, and we have done this with only a few lines of code, no manual mapping or anything, in a very elegant way using Func and anonymous method within the call to Dapper’s query method.
CONCLUSION
I hope you have enjoyed this short demonstration of Dapper functionality. There is, of course, a lot more with Dapper, so I encourage you to go to their web site and to see some more examples of what you can do with it.
There are also Dapper Contrib and Dapper Plus extensions, that further add functionality to Dapper, such as bulk inserts and updates, GetAll, InsertMany and many other methods that greatly enhance the usability of this library.
Use Dapper for when you need to handle a heavy load in an enterprise production environments.
